Alan_Bernardo
Corporal
Posts: 64
Joined: Sat Mar 25, 2006 4:54 am

Shiloh AAR (Union)

Sat Apr 21, 2007 2:31 pm

I'm going to give this a go. Keep in mind that I'm pretty new to this game.

Here goes.

Here is the complete Shiloh scenario. I will be playing the Union side:


Image


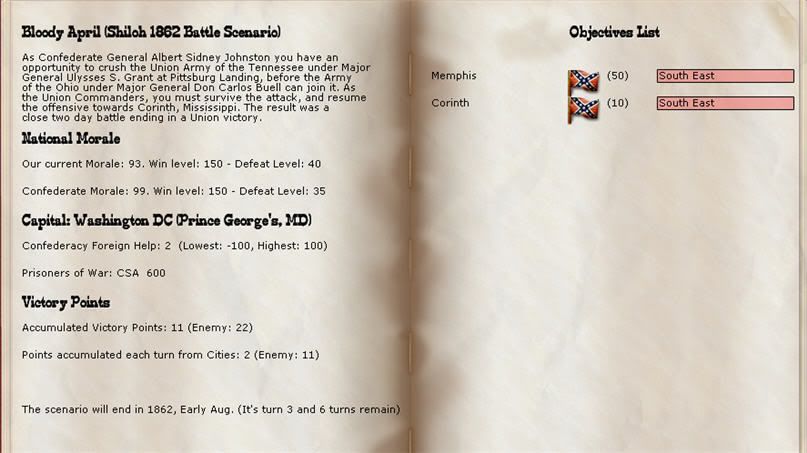
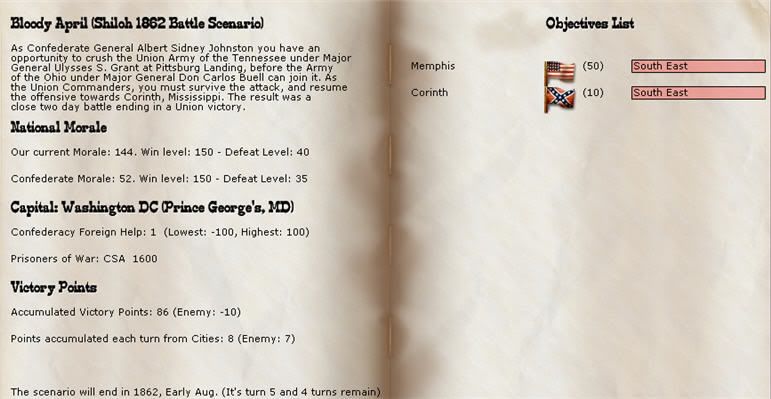
This is an 8-turn scenario. As the Union, the aim will be to capture and possess Memphis. As a secondary objective to the scenario, the Union also gets Victory Points for grabbing Cornith.

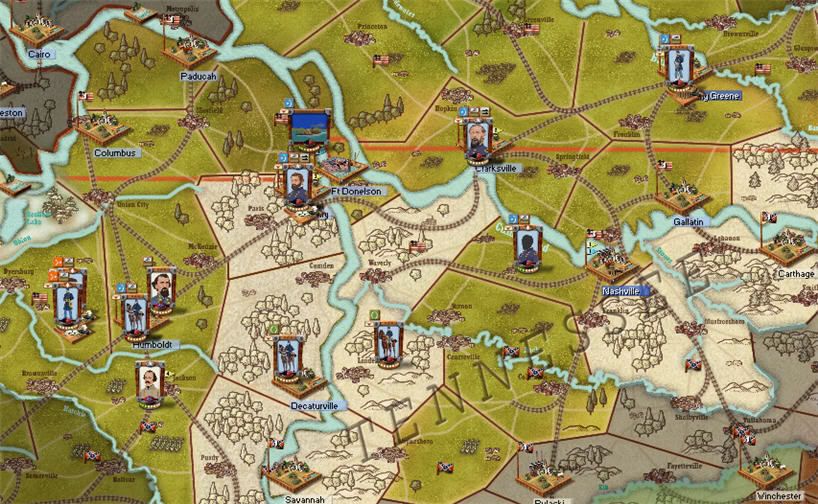
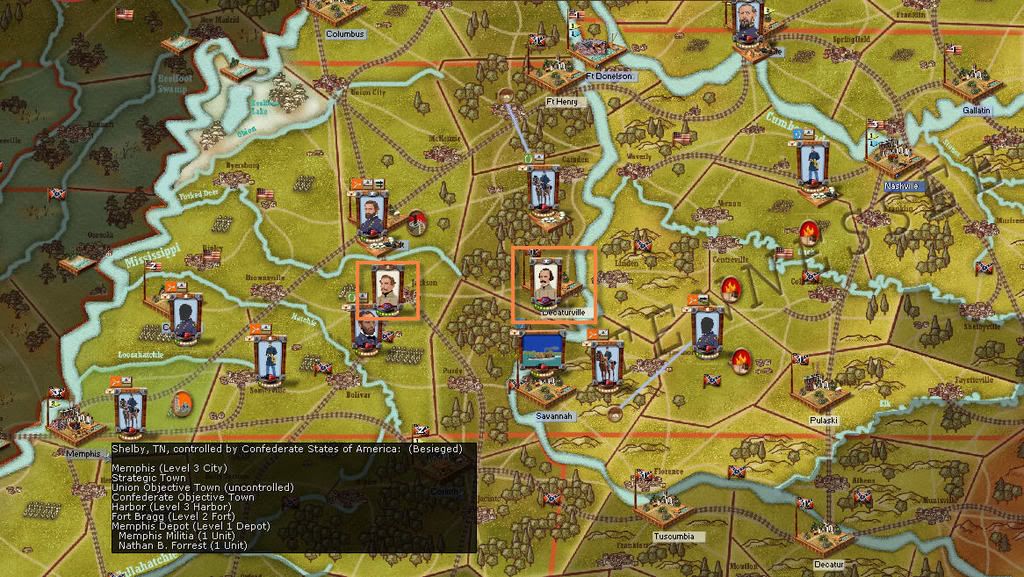
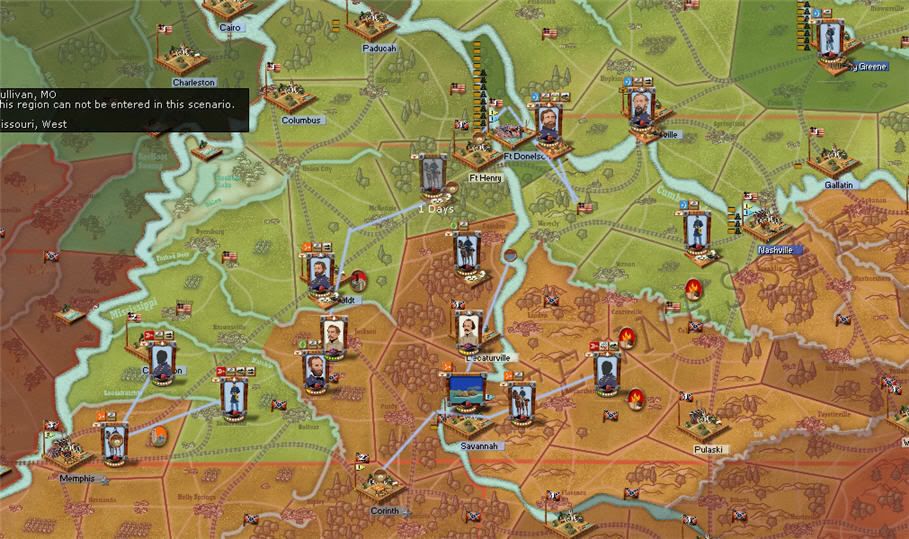
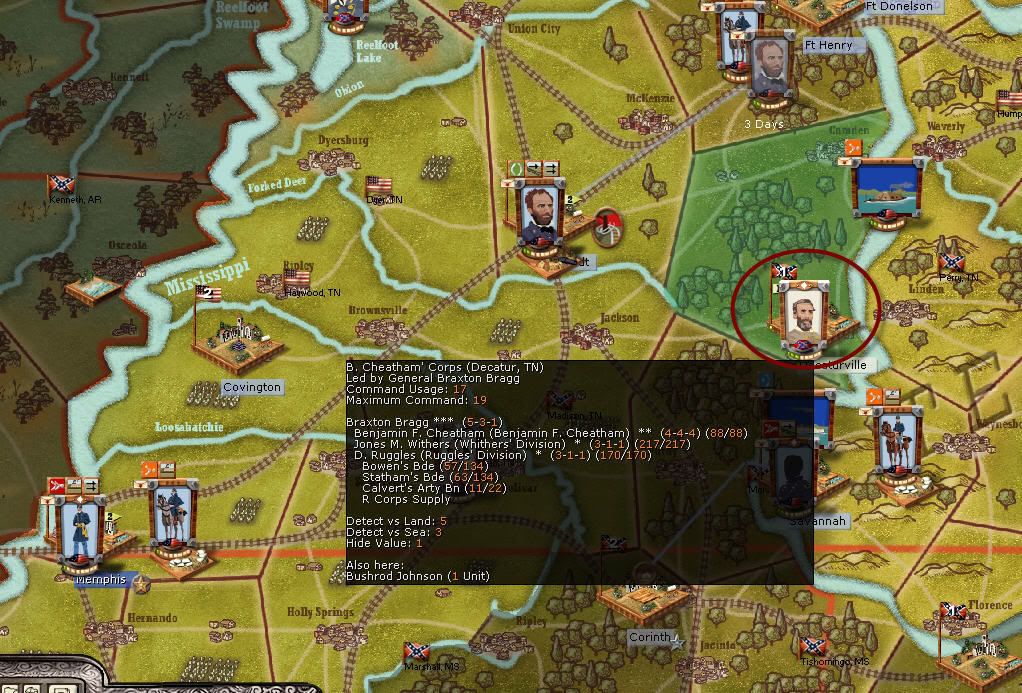
The map at the beginning of the scenario looks like this:


Image


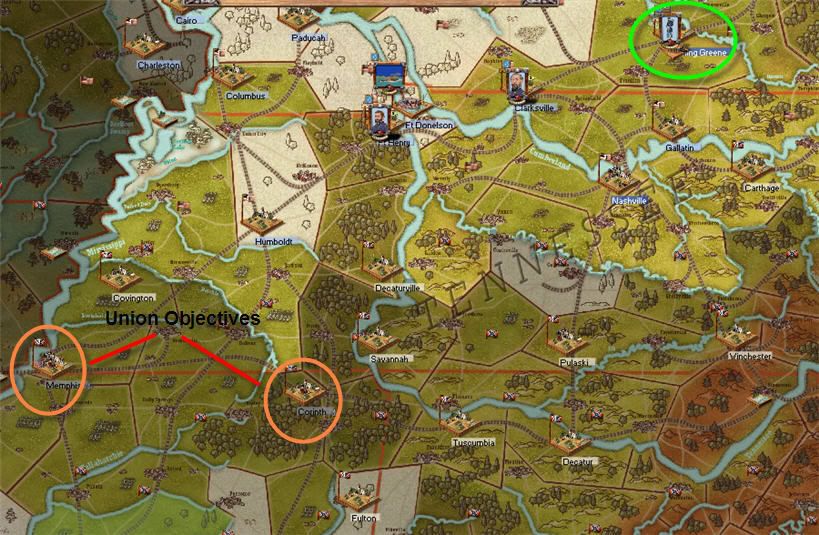
The Union objectives to the southwest are Memphis and Cornith. Memphis is the big one, with Cornith being a secondary aim. In the northeast is the Confederate objective.

In Bowling Green I have three untis of the Kentucky Reserve and two supply wagons. The Kentucky Reserve is frozen for the entire scenario and cannot move.

Just to the southeast, in Nashville, the Union has the Nashville Force, also frozen. Along with this force are two naval units:


Image


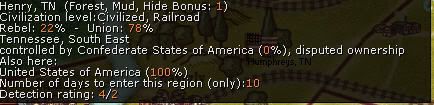
I’m not sure what use the transport will do, and if there will be any movement of troops via transport of not. One would think that the Transport is there for a reason and ought to be put to use. Some sort of defensive line will have to be set up along the Cumberland River, to prevent the Confederates from making a move on Bowling Green. To the north of the river is a perfect place to set up defensives—a Confederate move across the river and into a moderately defended line will be tough to deal with.

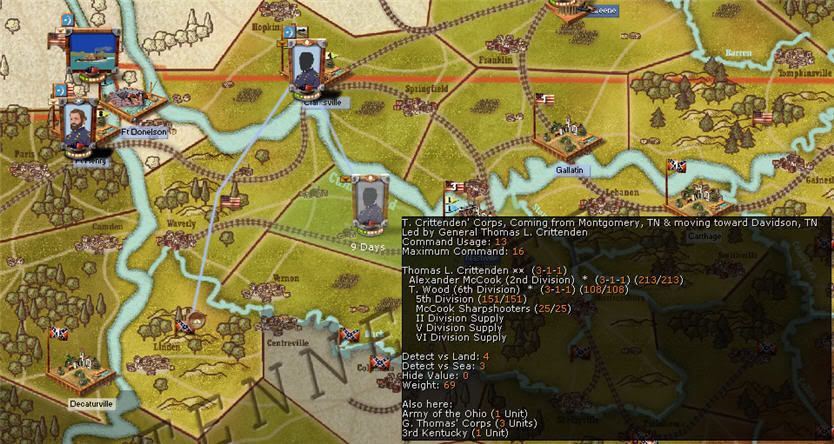
The Army of the Ohio, led by Buell, is in Clarksville:


Image


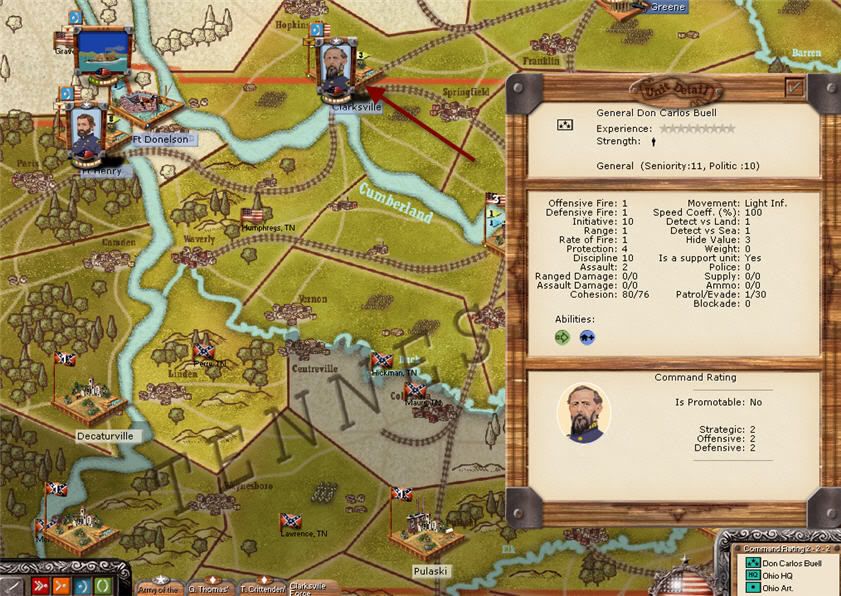
Buell is a “slow mover”, giving a 25% move penalty to the whole stack. He also is a “good population administrator”, meaning that if he is the most senior general in the region population loyalty will increase over time. I’m not sure how I will use this attribute, but being a slow mover could mean that I will use this army as my defensive line, maybe using one corps and sending the rest forward.

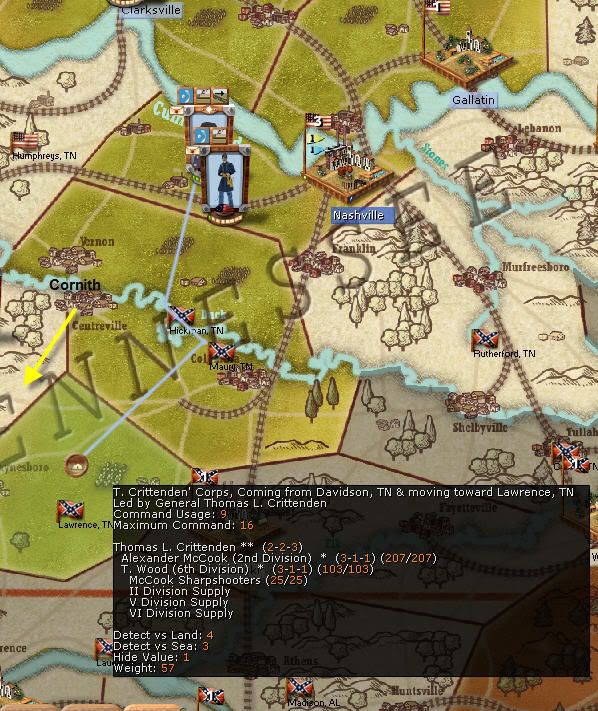
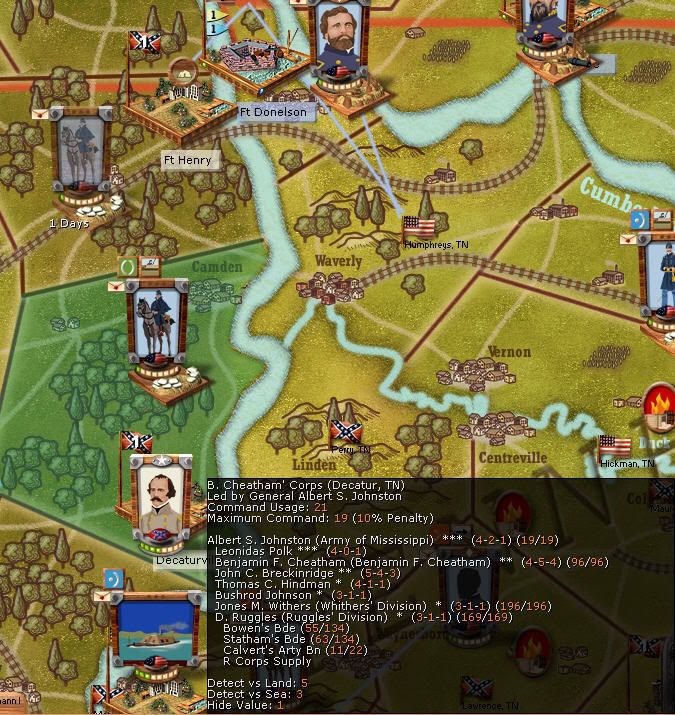
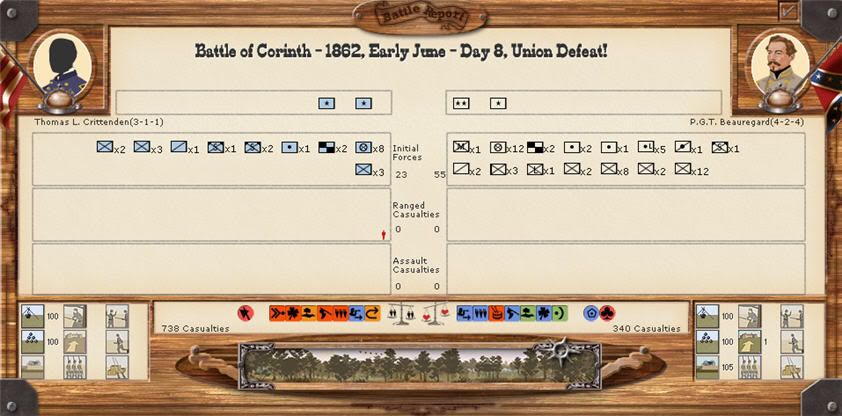
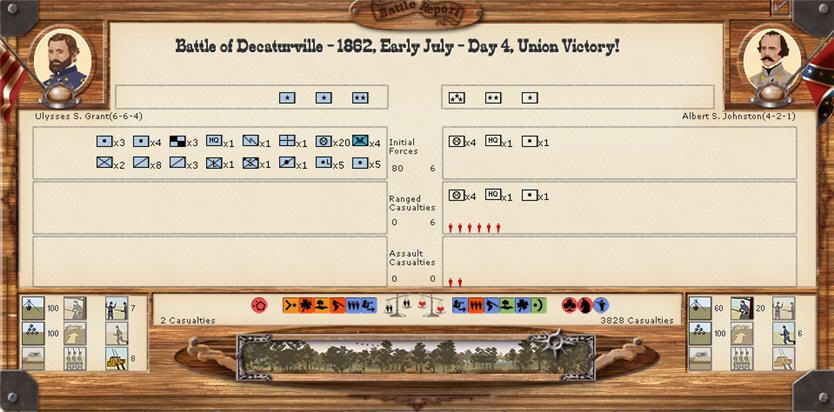
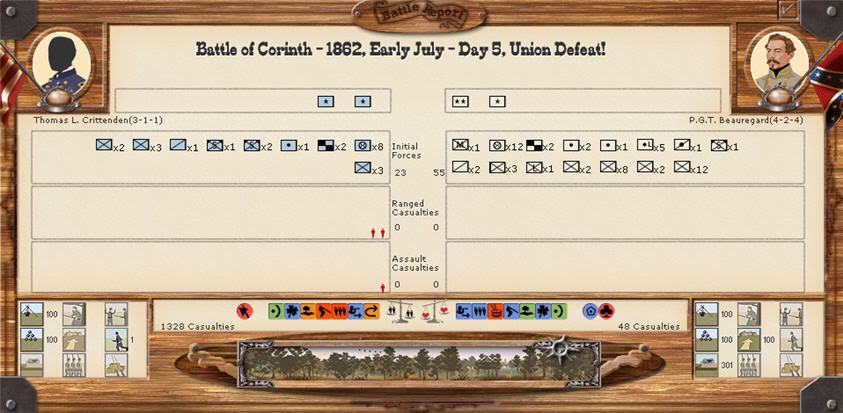
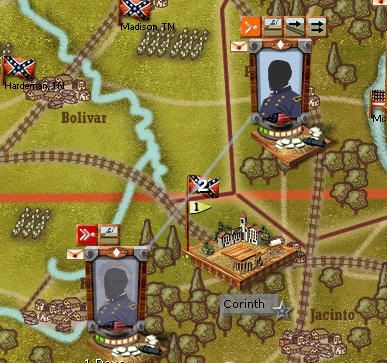
Within General Crittenden’s corps there is some seige artillery, which I probably will use to take Cornith. General Thomas, who also has a corps in Clarksville and is a part of the Army of the Ohio, has a good defensive rating (6), a primary candidate to set up a defensive line north of the Cumberland.
I don’t see the Confederates sending much of a force to attack Bowling Green, so one corps is quite enough for the defense. Crittenden’s corp I will move southwest, heading toward Cornith.

But first I decide to detach a cavalry unit with decent patrol/evade numbers (10/12), to keep an eye on what the Confederates might be sending north.
Before this move I detach the 2nd Division from Thomas’ Corps, attaching it to Crittenden. Also from Thomas to Crittenden I transfer a Skirmisher Unit (which has a sharphooter attribute) and one supply wagon.
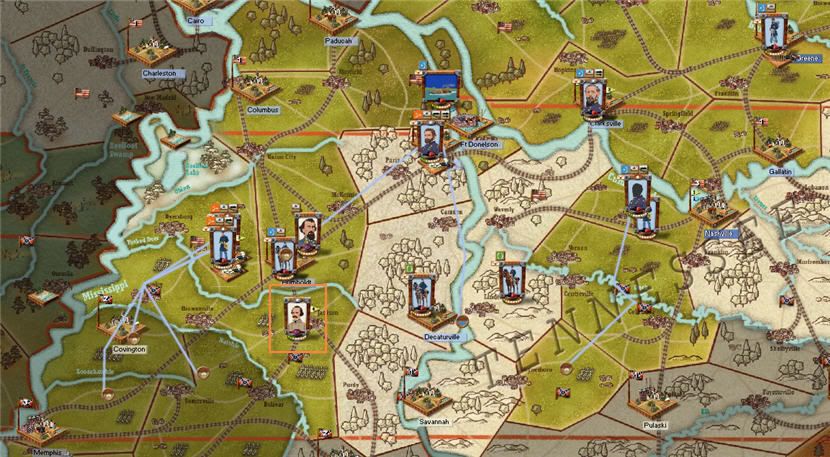
Here are the moves then, primarly made to capture Cornith and defend any Confederate move to Bowling Green.

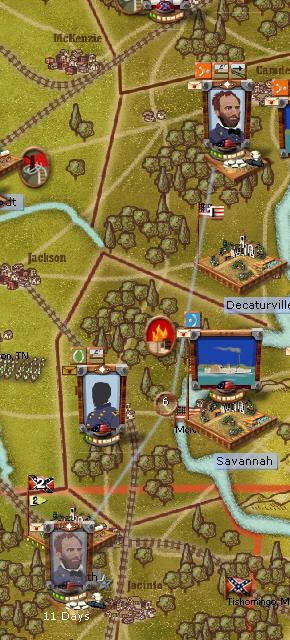
First is the 3rd Kentucky Cavalry, taking 12 days to go southwest through Humphreys, Tennessee, to Perry, Tennessee:


Image


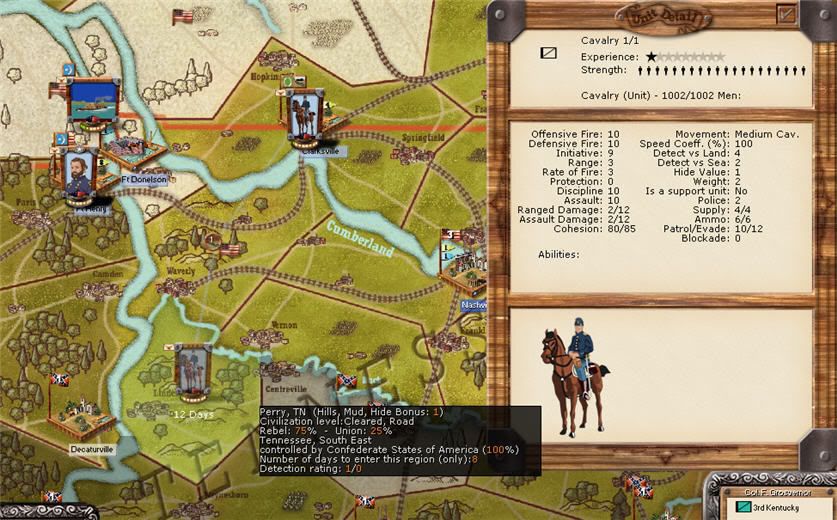
The Third Kentucky is given a passive stance. The hills in Perry provide a hide bous of 1. From here, I should be able to monitor any Confederate movement.

I keep Thomas in Montgomery, Tennessee, north of the Cumberland. I send Crittenden just northeast to Montgomery, to await a move deeper south once I see what the Confererades are up to:


Image


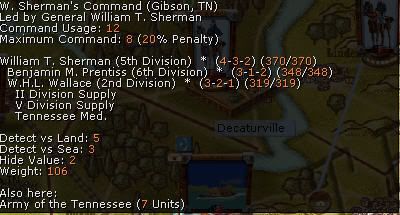
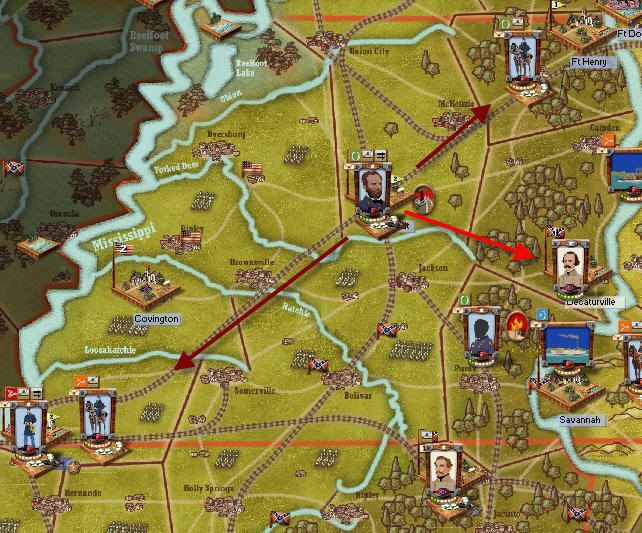
Now to deal with the Army of the Tennessee, located in Henry, Tennessee, west of Clarksville. The First Division is led by General McClernand, a two-star general. I will split this division and then attach it to the Army of the Tennessee, froming a corps. A also form a corps with my other two-star in the area, General Wallace.

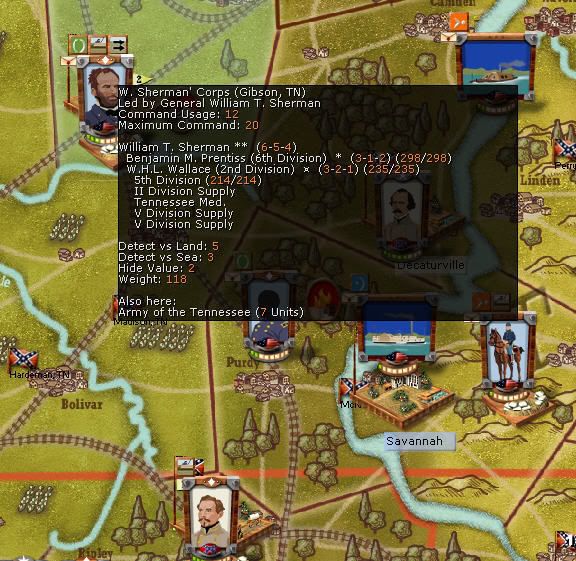
Now to get things moving toward Memphis, the Union’s primary objective. The 6th Division will stay in Henry. Led by General Prentiss, who is better defensively than offensive, this division will keep an eye also on any Confederate move toward Bowling Green.

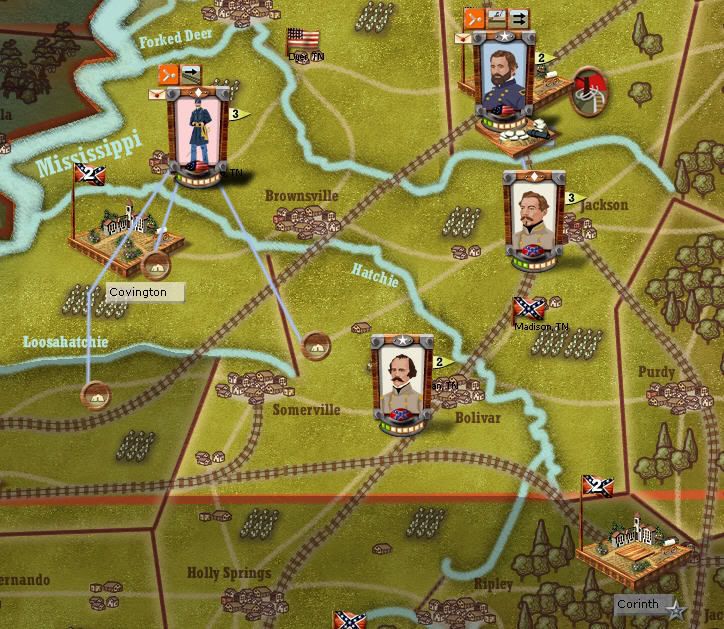
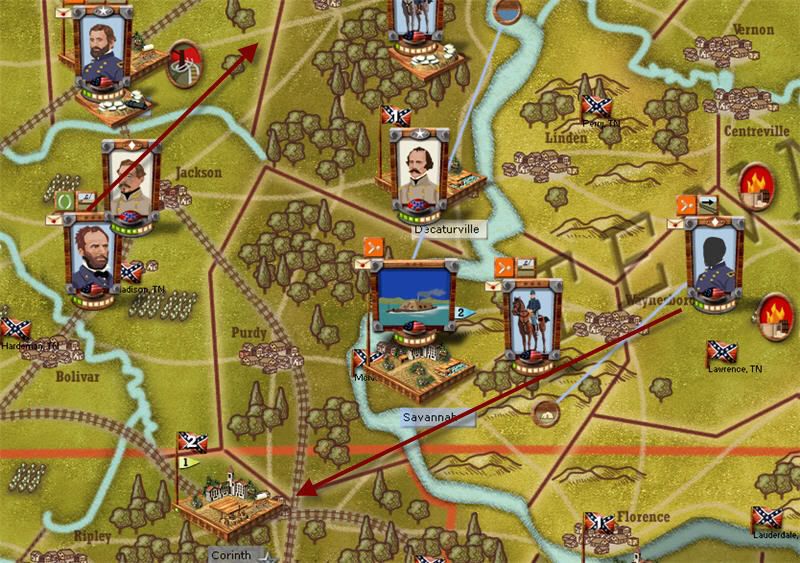
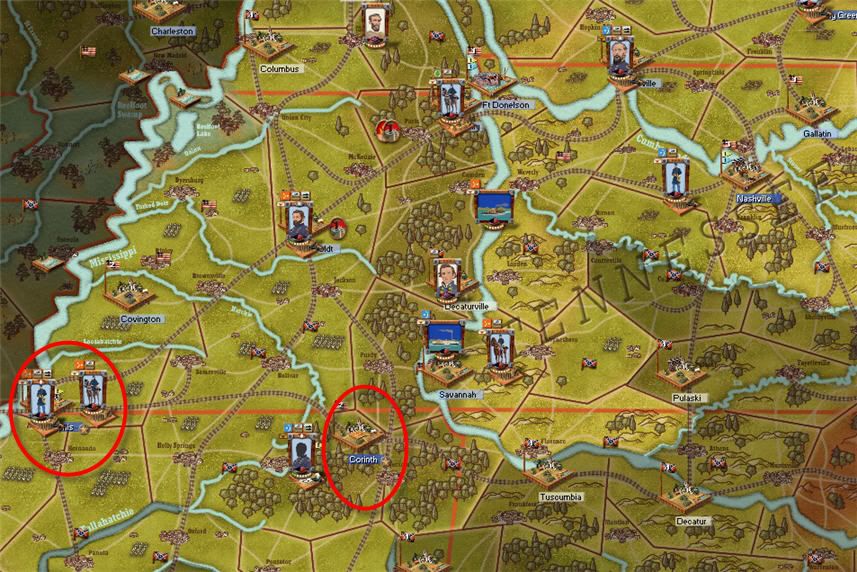
I detach a cavalry unit from the 4th Division and send it by rail southwest to Humboldt, to monitor. From Sherman’s 5th Division I send another cavalry unit directly south to Decatur. The area is wooded and will give the cavalry a hide bonus of 1.

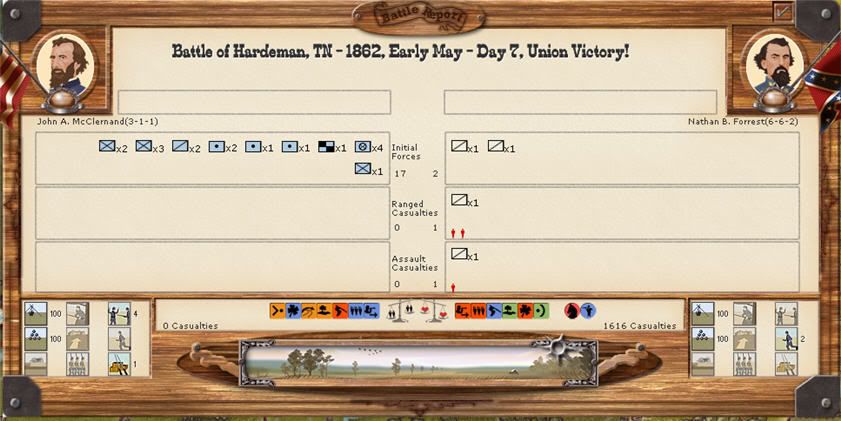
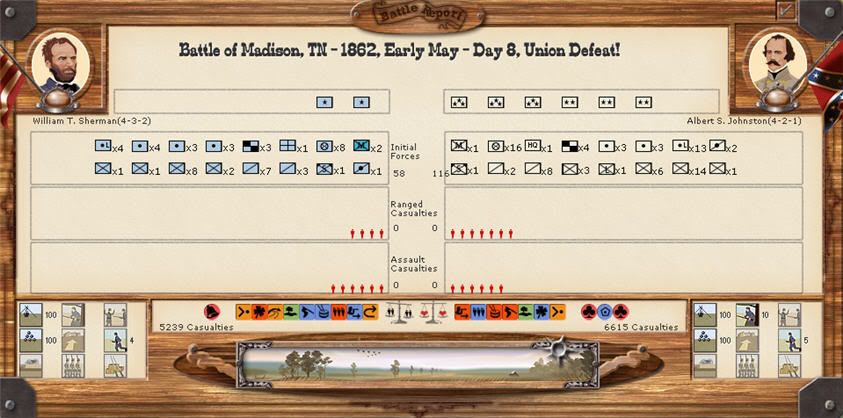
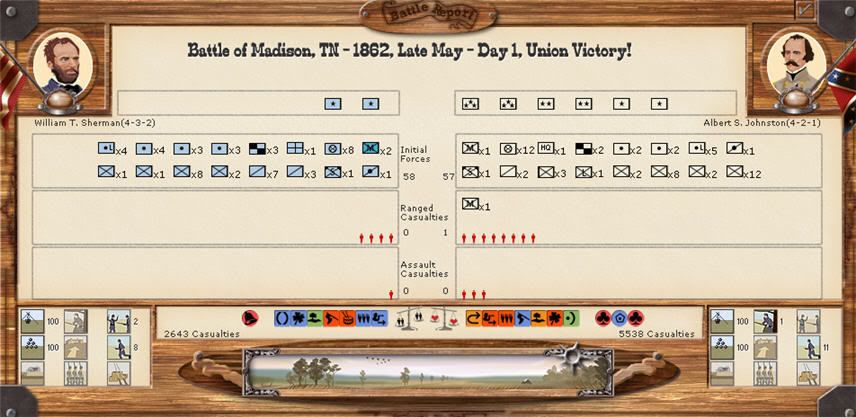
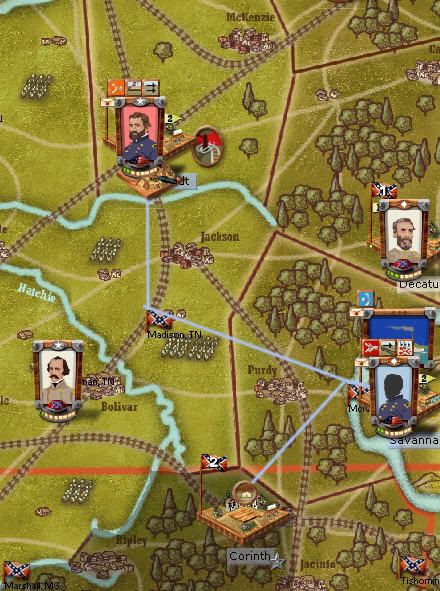
With Sherman (best offensive general present) leading, I send the 5th and 2nd Divisions straight to Madison, Tennessee, with an attack posture. Madison is just south of Humboldt. I think this force will be sufficient enough to defeat any Confederates in the area. If the Confederates decide to send a strong force in the same direction, I’m doomed. :)

I move the 3rd Division into Wallace’s Corps, and send the whole force to Dyner, Tennessee, southwest of Henry. I do the same with McClernand, both set to attack posture. This will be the main force which will attempt to push on to Memphis.

The Cumberland Fleet is moved to Waverly Run, to support the cavalry moving south. I keep the gunboat in Nashville where it is.
Here’s the situation, before the turn is run:


Image


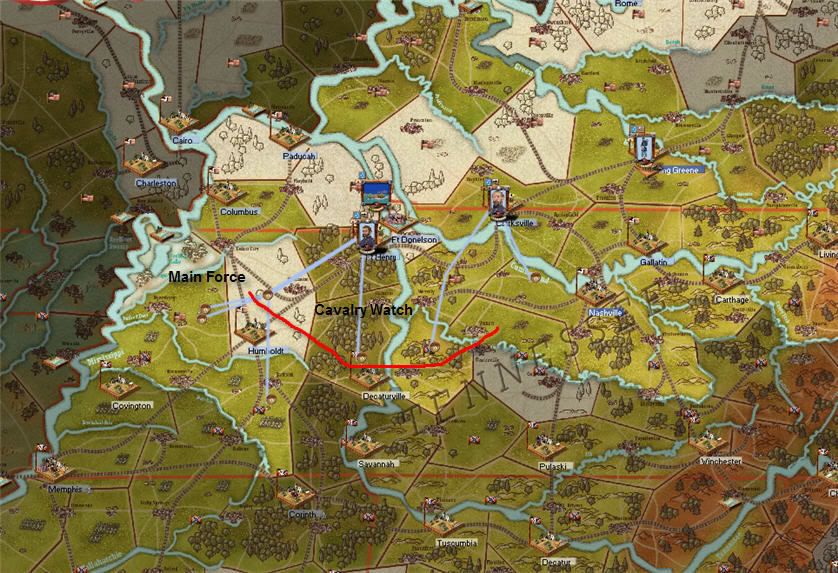
My main force is moving southwest. Sherman’s force is penetrating deeper to the southwest, and my cavalry is monitoring across a few areas.

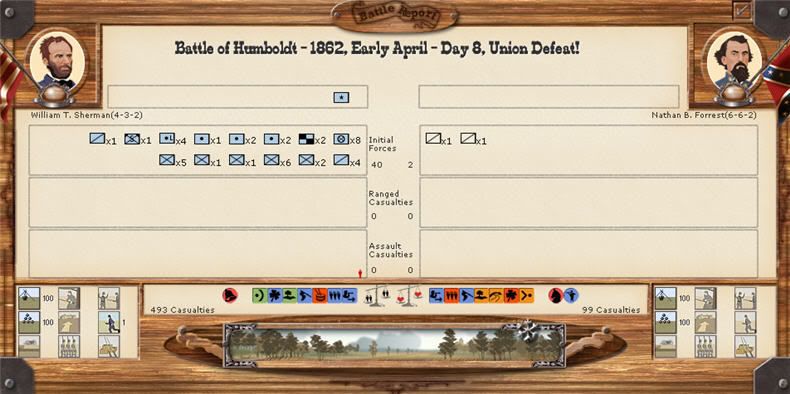
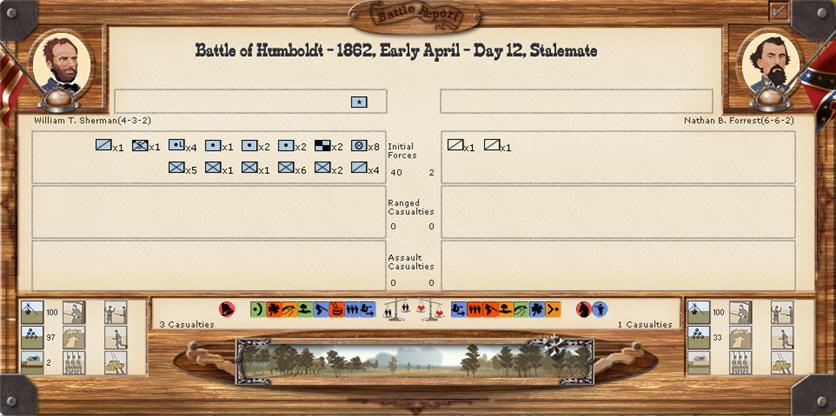
I’ll run the turn and show what has happened during my next post.

Any suggestions or comments on my approach are more than welcome. :)


Alan

frank7350
Brigadier General
Posts: 429
Joined: Fri Feb 24, 2006 1:18 am

Sat Apr 21, 2007 9:16 pm

good read so far!

Alan_Bernardo
Corporal
Posts: 64
Joined: Sat Mar 25, 2006 4:54 am

Sun Apr 22, 2007 2:57 pm

The turn generated, the Union forces suffered a defeat at the battle of Humboldt:


Image


Not sure what happened here. The Confederates had two cavalry units and the Union had quite a bit more, but still the Union lost. Maybe I’m not seeing something that I should be seeing.

I thought I had Sherman on attack posture but maybe I didn’t and that’s the reason for the defeat.

In Madison, Tennessee, things were different. The Union won that battle, suffering 582 casualties to the Confederate loss of 2742:


Image


This was again Sherman’s Division.

My single cavalry regiment was defeated in Humboldt. I didn’t expect much enemy movement. The Confederates had to cavalry units, led by Forrest (6-6-2).

More battles in Humboldt. Again it was Sherman and Forrest, and this time it resolved into a stalemate:


Image


The casualties were extremely low.

Another battle in Humboldt, with the same contestants. The Union won this battle, suffering 3 dead to the Confederate’s 53.

Humboldt once more, with the same result.

Here’s how things look after the turn finished:


Image


Supply looks in good shape. Johnson’s Confederate Army of the Mississippi is in Madison, Tennessee, led by Johnston. It contains a bunch of generals and and two corps. General Forrest has moved to Gibson, Tennessee, between my cavalry unit and Henry, Tennessee. Forrest only has the 1st Mississippi Cavalry with him. Nothing else seems to be happening in and around Hickman, Tennessee, to the east.

There doesn’t appear to be much room for the Confederates to loop to the east and then north to threaten Bowling Green. I keep the Union detached force in place in Nashville and move most of Crittenden’s force further to the southeast, heading for Cornith. I leave the 5th Division behind, as reserve:


Image


Cornith sits just to the southwest. Hopefully I will get there by turn three.
I send Foote’s command of naval units down the Cumberland. I’m not quite sure if some of these units are two big for the Cumberland or not.

Back west, I send Grant’s Army of the Tennessee with one Division, headed by Prentiss and various other units, straight down on Forrest in Gibson, Tennessee. This might draw Johnston and allow my main force to the west to slip by and head unmolested toward Memphis. It’s probably a risky move but we’ll see what happens. I detach a cavalry regiment and send it down to Memphis, to check on the situation. Wallace’s Corps moves to Covington, just to the southwest. McClernand’s Corps, much smaller than Wallace’s, will move to Hardeman, Tennessee, in an attempt to isolate Johnston’s Army of the Mississippi.

Here’s how it looks before the next turn:


Image


That's all for now.


Alan

Alan_Bernardo
Corporal
Posts: 64
Joined: Sat Mar 25, 2006 4:54 am

Mon Apr 23, 2007 1:22 am

It’s either success or failure. I’m uncertain whether all this is going to work the way I’ve planned.

This was a quiet turn, with no battles. Beaureguard’s Corps, previously in Gibson, Tennessee, has retreated south to Madison.

Led by Johnston, the Army of the Mississippi is now in Hardeman, south of Beaureguard. Beaureguard has destroyed the rail between Gibson and Henry, cutting off my supply. I will need to repair that, though I think my supply can be rerouted through Hickman.

My main force in the west has not reached their destinations yet. Johnston I’m sure is heading to Memphis: hopefully I can beat him there. Wallace’s Corps might ingage and delay Johnston.

In the east nothing is happening with no Confederate sightings.

Here’s how everything looked after the turn:


Image


Here is the VP situation:


Image


There are still six turns left. There’s no reason to rush. Getting Crittenden’s Corps with its two divisions over to Cornith is going to take some time.
For this turn I move my 3rd Kentucky Cavalry down further south, along with my naval units.

I want to send Sherman’s command of the 5th and 2nd Division at Beaureguard, who looks like he has a total of 13 units. I might beef up Sherman a bit more and add a general, because I doubt very much if Johnston is going to come my way. My guess is that he will move west to cover Memphis.

Here is Sherman’s command, which I will send at Beauregard. It should be strong enough:


Image


Before the next turn is advanced, here are my plots in the west:


Image


Next turn will come on the next post. This is going to be the turn that might decide whether the Union wins or loses. I need Sherman to derail Beaureguard and give him a good fight.

Also, my main force must reach Memphis before Johnston's force gets there.


Comments and suggestions are welcomed and encouraged.

Alan

User avatar
Chamberlain
Captain
Posts: 182
Joined: Wed Apr 18, 2007 7:46 pm
Location: New York

Mon Apr 23, 2007 11:11 am

Alan,

Very nicely done so far...

Good luck with the remaining 6 turns.

Give 'em Hell !!!

Chamberlain

Alan_Bernardo
Corporal
Posts: 64
Joined: Sat Mar 25, 2006 4:54 am

Mon Apr 23, 2007 3:46 pm

The Union begins the new turn with a victory at the Battle of Hardenman, Tennessee:


Image


The Confederates suffered 1616 casualties, while not one Union soldier was killed.

In the bigger and more crucial battle, Sherman lost to Johnston. Casualty figures were pretty even. But the Confederates had the larger force, and I probably shouldn’t have risked it or sent in more troops:


Image


I still don’t have a very good handle on what specific troops with what specific abilities I should send into battle, based on terrain and the opponent. The defeat might be the Union’s death knell.

The map now looks like this, with only two battles happening this turn:


Image


Johnston’s Army of the Mississippi has moved to Decatur, and Memphis looks to be nearly empty. However, I left Fort Henry empty, and the Confederates have captured it. Memphis is pretty much going to be in possession of the Union, and now it looks like my forces in the east are going to have to cut off Johnston. I’m not absolutely sure whether this situation is good or bad. I know that Memphis is a primary objective, and the Union will soon have it.

The Union’s current morale is 94; if it goes to 40 the Union loses. Confederate morale is at 99, with a level of 35 meaning defeat.

I purchase some replacements, which I didn’t know was available for this scenario. I bought some supply and other units.

My own sense here is that things are not looking all that bad. The question will be whether I have enough to keep Johnston in check. Losing Fort Henry might have also imperiled my supply.

From looking at things, it doesn’t look like it will take much to regain control of Ft. Henry. My supply depot is in Ft. Donelson, the fort to the northeast of Ft. Henry.

The tooltip for Henry, Tennessee says:


Image


Over in Montgomery, Tennessee, directly east of Stewart, I have the Army of the Ohio, with General Thomas in charge of a corps there. His command ratings are 3-4-8, the last number being his defensive rating. By rail he will be inside the Ft. Henry in three days.

Now I need to see what I can do to head off Johnston, who is still a few regions south of Ft. Henry, in Decaturville. I do have one cavalry unit between Johnston’s forces and Ft. Henry, or at least one unit on the way:


Image


Under Admiral Foote, I move three River Ironclads and one Gunboat up the Cumberland River, to help harass Johnston.

I have a choice of either taking Sherman’s command of two divisions back up north to Ft. Henry or else using that force to take Cornith, which is unprotected, except for one Confederate militia unit.

If I decide to move Sherman up north, then I will use Crittenden’s Corps, made up of two divisions, to take Cornith, as was planned in the first place. A Sherman move on Cornith makes it necessary that Crittenden go to cover Ft. Henry.

I decide to use Sherman to protect Ft. Henry and Crittenden to take Cornith, though Crittenden’s Corps has to cross the Cumberland to reach that city:


Image


These are the moves, with Sherman moving north and Crittenden to take Cornith. His corps is one day from Hardin, then over the river and he’ll be in Cornith.

It will take nearly 30 days to get to Cornith, where Crittenden’s Corps will assault the fort. That’s about two turns.

Wallace’s Corps move to assault Memphis, a six-day trip. I take Sherman up to Ft. Henry. He’ll get there if he can bypass Beauregard.

McClernand’s Corps, now in Hardeman, is also sent to assault Memphis. He will get there in six days. If all goes well, things should be looking good next turn.

I’m a little worried about supply. But from the looks of the supply-filtered map things look fairly good:


Image


Crittenden’s Corps, now Lawrence, Tennessee, and heading toward the assault of Cornith, has three supply wagons with him. It says he has 99% of capacity. His food stock is 325, and he uses up 37 a turn. That sounds like he’s in good shape for a while.

The next turn started with Sherman’s command defeating Johnston at the battle of Madison:


Image


The Union also defeated a small Confederate force at the battle of Fort Bragg:

The Confederates suffered 832 casualties:


Image


Ft. Henry is now back under Union control. Sherman’s force made it to Gibson, Tennessee, making its way to Ft. Henry:


Image


Wallace and McClernand have made it to Memphis and are besieging the city; the Confederate troops are in the area. In the coming turns I will spend the necessary time securing this area.

The national morale for both sides and the victory points have changed drastically: the Union looks to be in complete control:


Image


Now it’s time to prepare the Union moves for the next turn. Everything is looks good so far.

The main thing to be done is to secure Memphis and hold on to that city for the remaining four turns. The question now again revolves around what to do with Sherman, and how much is needed to hold Memphis.

The only Confederate force of any strength right now is Cheatham’s Corps, led by Bragg, now located in Decaturville. Decaturville sits between Ft. Henry and Cornith and is northeast of Memphis.

Bragg’s Corps is made up of two divisions:


Image


From the intelligence on Bragg and compared to Sherman, Bragg has the stronger force, though its strength is not overwhelming. Sherman’s command is made up of three divisions, while Bragg’s has but two. The numbers favor Sherman but the overall strength, it appears, belongs to Bragg.

Bragg either moves on Memphis or else heads north to try and recapture Ft. Henry. For a Union victory, Memphis is the more important site: it’s very possible that Bragg will move there, instead of toward Henry, Tennessee.
Sherman’s current orders are to move to the northeast and stabilize Ft. Henry.

The good thing here is that Sherman can be promoted to a two-star and then attached as a corps to the Army of the Tennessee.

I decide to promote Sherman, and for the time being cancel his orders to Ft. Henry, to wait and see what Bragg does.

Johnston’s Army of the Mississippi in Hardeman, Tennessee, just east of Memphis, is no real threat.

I order some replacements and move a supply wagon from Crittenden’s Corps in Harden northwest to Sherman before ending the turn:


Image


The next turn begins with a Confederate victory at the Battle of Cornith:


Image


Sherman was promoted to a two-star and the supply wagon has reached his camp. Now that Sherman is a two-star his 5th Division is split and a new corps, attached to the Army of the Tennessee, is formed. This gets rid of the command penalty and makes Sherman’s Corps a very lethal fighting force:


Image


Composed of two divisions, Beauregard’s Corps is in Cornith. Crittenden’s Corps has retreated to McNairy, Tennessee, made up as it is of two divisions, both of which are considerably weaker than Bragg’s Corps to the northeast.

It looks as if the Confederates have decided to concede Memphis and try to hold Cornith.

Sherman’s Corps, however, is dominate in the area—extremely dominate.
Morale for the Union is but six points short of win level, with three turns remaining.

Sherman’s options are now actually three. First he can go to Ft. Henry and secure that area. Second, he can go south and help to further reinforce Memphis. Lastly, he can attack Bragg’s Corps to the east, in Decatur.

The latter of the three possibilities is probably the best:


Image


As is, Beauregard’s Corps is not strong enough to take the Union forces at Memphis, so there is no reason to detach a division from Sherman’s Corps to help in that area. If Beauregard leaves Cornith, Crittenden can grab that objective.

In the east, everything is secure: the Confederates are making no show in this area so I don’t have to change a thing. Bowling Green is secure.

The decision then is to have the forces in Memphis set on assault and to move Sherman on Bragg’s Corps.

The next turns starts with Johnston’s attempt to attack Grant at Ft. Henry, resulting in a Union victory:


Image


Casualty figures were about even. No more battles besides this one happened.

Here now is the situation: two turns remain:


Image


Cheatham’s Corps, made up of two apparently depleted divisions is in Ft. Henry. The Union controls 91% of the area. It is unlikely that the

Confederates can do anything more, like capture Ft. Henry.
Sherman’s strong force now sits between Ft. Henry and Johnston’s Army of the Mississippi, which contains no divisions. That force looks to be of no consequences.

Beauregard’s force has hunkered down in Cornith. Intelligence is reporting 10 units in this force.

The plan for this turn is to have Sherman again attack Johnston and push him further south. It’s possible, in the two remaining turns, for Sherman to take Cornith.

In the meantime, while Sherman takes care of Johnston, Crittenden’s Corps, somewhat rested, will attack Beaureguard at Cornith.

There’s a battle at Decaturville to begin the next turn:


Image


Crittenden, however, loses the Battle of Cornith:


Image


This is the next to the last turn. It’s not likely that Union forces will be able to take Cornith. Still, Sherman’s forces make a last-ditch effort to take Cornith:


Image


The fight for Cornith turns into a stalemate:


Image


There is one more turn. Cheatham has moved to Ft. Henry. I’m not worried too much about that, seeing that this is the last turn.

I will try and take Cornith with Sherman again, in an all-out assault; Crittenden joins the fight:


Image


Image


A final look at the map, at the end of the scenario, with both objectives at Memphis and Cornith occupied by the Union forces:


Image


That's all she wrote. I had the AI on normal and did not give it any more time to think out its moves, which increases the difficulty. Next time I will up the difficulty level and see what happens.

For now, Shiloh is over.


Alan

User avatar
pasternakski
Colonel
Posts: 341
Joined: Fri Feb 24, 2006 6:50 pm

Mon Apr 23, 2007 4:02 pm

Congratulations, Alan, and a very nicely done AAR, too. Very instructive.

Thank you.

User avatar
Chamberlain
Captain
Posts: 182
Joined: Wed Apr 18, 2007 7:46 pm
Location: New York

Mon Apr 23, 2007 4:40 pm

Alan,

Congratulations on your victory as I see an On-Field Promotion coming your way :)

The AAR scenes and your narrative were very good.

I started this same scenario, looked at the map & and said to myself,

"Where do I start ?" :bonk: "What do I do first ?" :bonk: :bonk:

Again, I will be reviewing your AAR to get some hints & ideas to start my

battle.

Thanks for sharing

Chamberlain

Return to “American Civil War AARs”

Who is online

Users browsing this forum: No registered users and 10 guests