[font="Courier New"][RIGHT]HEADQUARTERS WESTERN COMMAND,
Cassville, Mo., Late March, 1862[/RIGHT]
Maj. Gen. Henry W. Halleck, Commander-in-Chief Western Theater:
GENERAL: I hereby submit to you a report on the condition of the forces under my command, and likely dispositions of the enemy forces believed arrayed against us.
At present, my command consists of three understrength divisions, all of which could be amalgamated into a mere one full strength division, if such a reorganization were to be undertaken. Roughly one third of said troops being militia.
Rebel forces to the south of us seem to be two divisions of undetermined strength and character, under command of Gen. Van Dorn. To add to our worries, large bands of pro-Confederate Indians under Stand Watie are hovering over our western flank.
To further add to our worries, it's snowing.
Under present adverse conditions, I seek permission to withdraw my army to Springfield, there to await both reinforcements and fairer weather.
I have the honor to be, sir, very repectfully, your obedient servant,
[RIGHT]S. CURTIS,
Major General, Commanding.
----------------------------------------------------------------
HEADQUARTERS OF THE WEST,
St. Louis, Mo., Late March, 1862[/RIGHT]
SIR: Your dispatch has been received. Your request to redeploy to the north upon your depot at Springfield is granted. I shall endeavor to convince Washington to raise the necessary local regular troops to bring your command up to full strength, to facilitate your advance into Arkansas. Your prudence is laudable; the region can ill afford another Wilson's Creek contretemps.
I am, &c.,
[RIGHT]H. W. HALLECK,
Major General, Commanding.[/RIGHT][/font]
-
jimwinsor
- General of the Army
- Posts: 631
- Joined: Sat Apr 14, 2007 7:07 am
- Location: San Diego, CA USA
[font="Courier New"][RIGHT]HEADQUARTERS ARMY OF THE TENNESSEE,
Pittsburg Landing, Tn., Late March, 1862[/RIGHT]
Maj. Gen. H. W. HALLECK,
Commander-in-Chief West, St. Louis, Mo.:
SIR: All quiet here on the banks of the Tennessee. Excellent fields for drilling here, troops in high spirits. Awaiting arrival of Buell before pushing south, as planned. Where is he, do you know? He was due to arrive days ago.
Respectfully, &c.,
[RIGHT]U.S. GRANT,
Maj. Gen., Commanding
--------------------------------------------------------
HEADQUARTERS OF THE WEST,
St. Louis, Mo., Late March 1862[/RIGHT]
Major General GRANT, Army of the Tennessee:
Plans have changed. Buell will not be joining you. Proceed south at your own discretion, primary objective to be Memphis in cooperation with Maj. Gen. Pope; Corinth secondarily.
Yours, &c.,
[RIGHT]H.W. HALLECK,
Major-General, Commanding.
--------------------------------------------------------
HEADQUARTERS ARMY OF THE TENNESSEE,
Pittsburg Landing, Tn., Late March, 1862[/RIGHT]
Maj. Gen. H. W. HALLECK,
Commander-in-Chief West, St. Louis, Mo.:
SIR: May I inquire as to why Gen. Buell will not be arriving? What of the newspaper reports of a large concentration under A.S. Johnston and Beauregard at Corinth?
I remain, your obt. servant,
[RIGHT]U.S. GRANT,
Maj. Gen., Commanding
---------------------------------------------------------
HEADQUARTERS OF THE WEST,
St. Louis, Mo., Late March 1862[/RIGHT]
Major General GRANT, Army of the Tennessee:
GENERAL: A situation of grave strategic neccessity has been discovered, requiring the immediate redeployment of Buell's army, post haste, to eastern Kentucky. I shall explain in greater detail at a later time.
Yours, &c.,
[RIGHT]H.W. HALLECK,
Major-General, Commanding.[/RIGHT][/font]
Pittsburg Landing, Tn., Late March, 1862[/RIGHT]
Maj. Gen. H. W. HALLECK,
Commander-in-Chief West, St. Louis, Mo.:
SIR: All quiet here on the banks of the Tennessee. Excellent fields for drilling here, troops in high spirits. Awaiting arrival of Buell before pushing south, as planned. Where is he, do you know? He was due to arrive days ago.
Respectfully, &c.,
[RIGHT]U.S. GRANT,
Maj. Gen., Commanding
--------------------------------------------------------
HEADQUARTERS OF THE WEST,
St. Louis, Mo., Late March 1862[/RIGHT]
Major General GRANT, Army of the Tennessee:
Plans have changed. Buell will not be joining you. Proceed south at your own discretion, primary objective to be Memphis in cooperation with Maj. Gen. Pope; Corinth secondarily.
Yours, &c.,
[RIGHT]H.W. HALLECK,
Major-General, Commanding.
--------------------------------------------------------
HEADQUARTERS ARMY OF THE TENNESSEE,
Pittsburg Landing, Tn., Late March, 1862[/RIGHT]
Maj. Gen. H. W. HALLECK,
Commander-in-Chief West, St. Louis, Mo.:
SIR: May I inquire as to why Gen. Buell will not be arriving? What of the newspaper reports of a large concentration under A.S. Johnston and Beauregard at Corinth?
I remain, your obt. servant,
[RIGHT]U.S. GRANT,
Maj. Gen., Commanding
---------------------------------------------------------
HEADQUARTERS OF THE WEST,
St. Louis, Mo., Late March 1862[/RIGHT]
Major General GRANT, Army of the Tennessee:
GENERAL: A situation of grave strategic neccessity has been discovered, requiring the immediate redeployment of Buell's army, post haste, to eastern Kentucky. I shall explain in greater detail at a later time.
Yours, &c.,
[RIGHT]H.W. HALLECK,
Major-General, Commanding.[/RIGHT][/font]
-
jimwinsor
- General of the Army
- Posts: 631
- Joined: Sat Apr 14, 2007 7:07 am
- Location: San Diego, CA USA
[font="Courier New"][RIGHT]HEADQUARTERS OF THE WEST,
St. Louis, Mo., Late March 1862[/RIGHT]
Major General BUELL, Army of the Ohio:
SIR: Prepare your army, and both it's corps, for immediate entrainment to the outskirts of Lexington, Ky.
The reason for this shift of your force, in brief, is this: A hithertofore unknown railway has been discovered between Lexington and Knoxville, Tn. As east Kentucky remains strong in Confederate sentiment, this railway represents a GRAVE threat to the entire Union effort in the west.
In theory, if we do not act immediately - the entire Army of Northern Virginia could be poised on the outkirts of Cincinnati and/or Louisville, rendering them subject to rebel conquest and occupation, in seriatum, before we would have a chance to adequately respond. In theory, that is.
I for one do not intend to be the general caught with his britches down, so to speak.
[font="Arial"][out-of-character: for more on this mistaken, ahistoric railway, see my comments in the "Improove AACW" thread; frankly I'm amazed this hasn't gotten more attention; as you can all see, it IS fairly big deal!][/font]
As I said, deploy your forces by rail to the north of Lexington, making sure to cover both Cincinnati and Loiusville. I hardly need remind you of what a devastating blow to the Union war effort the loss of either of these centers would be. Then, depending on circumstance, sieze Lexington, and proceed south along this new rail, converting the line to Union control. In fact, do your best to win the whole of that region of Kentucky over to the national government; I predict grave supply difficulties if we neglect this needful task.
Do your duty well; the future of the Republic may hang on it.
Very respectfully, your obedient servant,
[RIGHT]H.W. HALLECK,
Maj. Gen., Commanding[/RIGHT][/font]
-
jimwinsor
- General of the Army
- Posts: 631
- Joined: Sat Apr 14, 2007 7:07 am
- Location: San Diego, CA USA
[font="Courier New"][RIGHT]HEADQUARTERS OF THE WEST,
St. Louis, Mo., Late March 1862[/RIGHT]
Major General Pope, Army of the Mississippi:
SIR: Your plan for an amphibious operation against the rebel installations at Island No. 10 is hereby approved. Proceed by rail to Cairo. I shall secure for you the authorization for use of the Cairo river flotillas, both transports and Eads gunboats, directly from Sec. Welles.
Make the operation as brief as possible, and keep those transports nearby ay all times. Gen. Grant may be calling on you for assistance before too long.
Godspeed to you, sir.
Very respectfully, &c.,
[RIGHT]H.W. HALLECK,
Maj. Gen., Commanding[/RIGHT][/font]
-
jimwinsor
- General of the Army
- Posts: 631
- Joined: Sat Apr 14, 2007 7:07 am
- Location: San Diego, CA USA
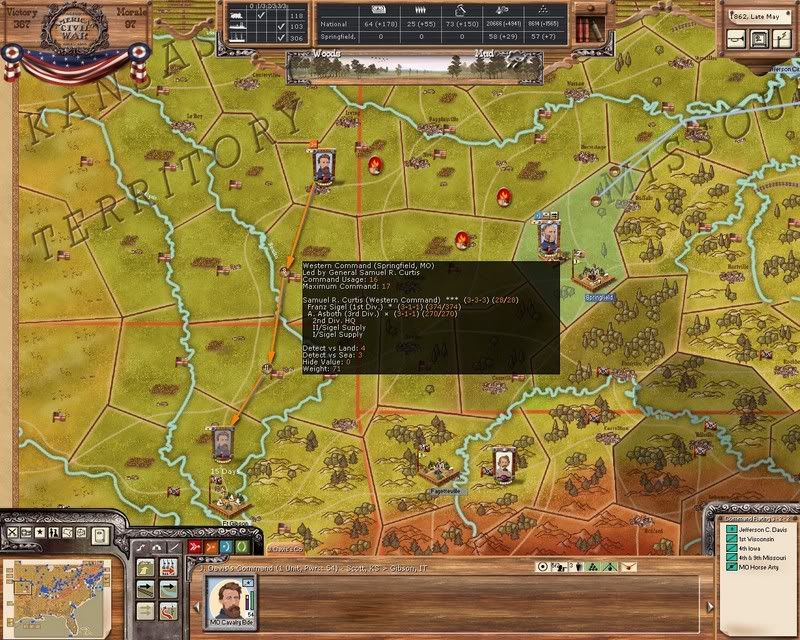
Union West, Turn 1 (Late March 1862)
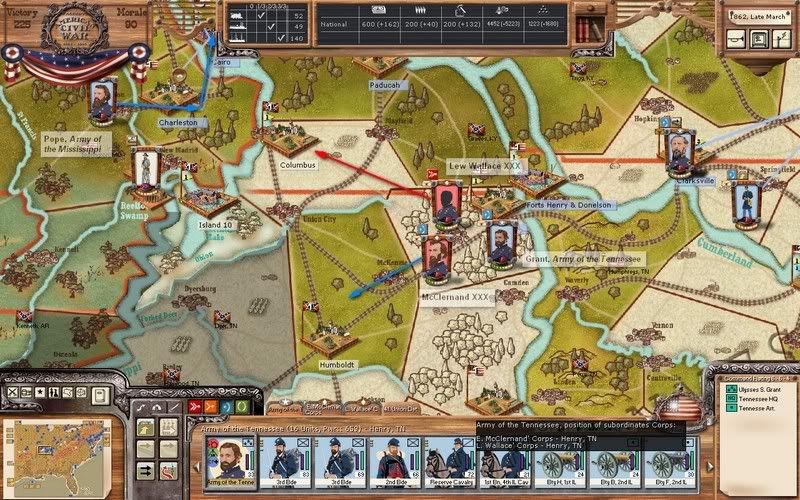
Grant probes to the west: Lew Wallace ordered to take Columbus, McClernand to occupy Humboldt. Grant stays with a sizable army reserve in Fort Henry, ready to react if either corps needs it.
Sherman is in Lew Wallace's corps; I'm hoping he'll manage to distinguish himself in action at Columbus.
-
jimwinsor
- General of the Army
- Posts: 631
- Joined: Sat Apr 14, 2007 7:07 am
- Location: San Diego, CA USA
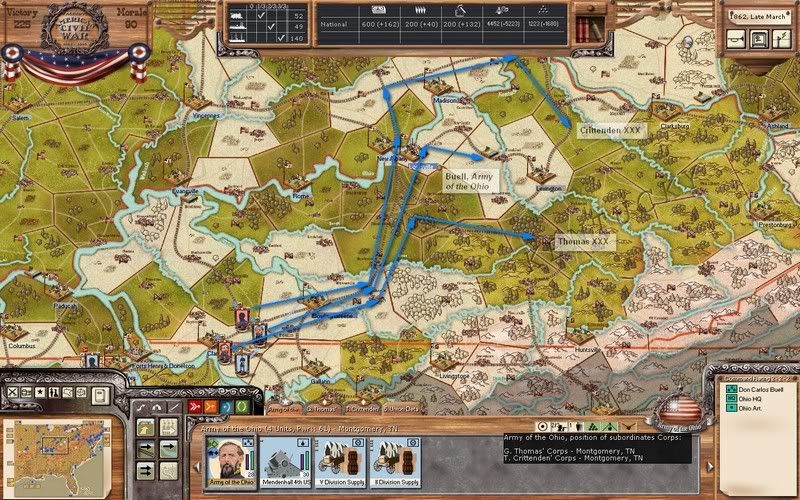
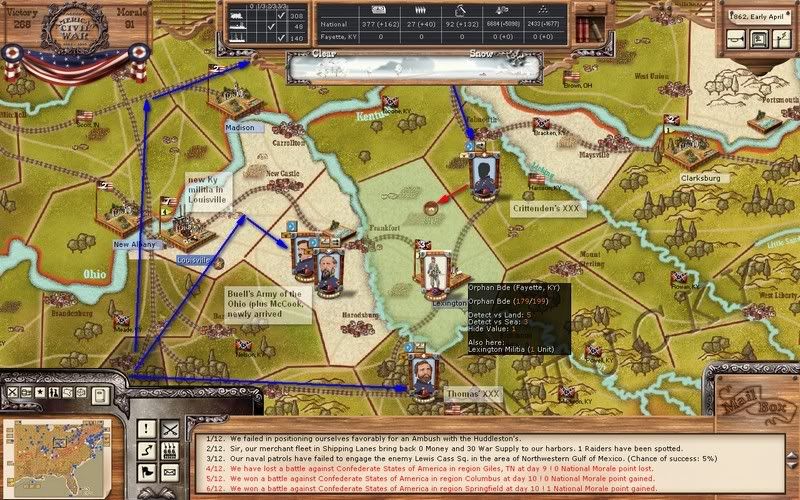
Buell's rail shift to the east; plan is to encircle Lexington, and have Crittenden assault from the non-river crossing side to the north. Thomas who is a "rock" on defense I place to the south, to hopefully cut off this dreadful rail line from doing me any more potential harm.
Kentucky right now is kinda strange. These provinces have CSA control flags, say CSA control 100%...but also say Union 50% there too. That adds up to 150%.

I'm guessing Kentucky is still neutral-ish, and this is how the game models the fact. It appears both USA and CSA can use the same rail lines simultanously right now!
It'll be interesting to see what's waiting near Lexington when Buell gets there.
this is the first turn, so perhaps there is an error in the setup, but the hosting module will normalize the percentages to 66/33 I think.
You can use a railway if you have 25% control, so yes both side can move by rail thru the same region.
You can use a railway if you have 25% control, so yes both side can move by rail thru the same region.

Hofstadter's Law: "It always takes longer than you expect, even when you take into account Hofstadter's law."
-
jimwinsor
- General of the Army
- Posts: 631
- Joined: Sat Apr 14, 2007 7:07 am
- Location: San Diego, CA USA
Victory in the Trans-Mississippi!
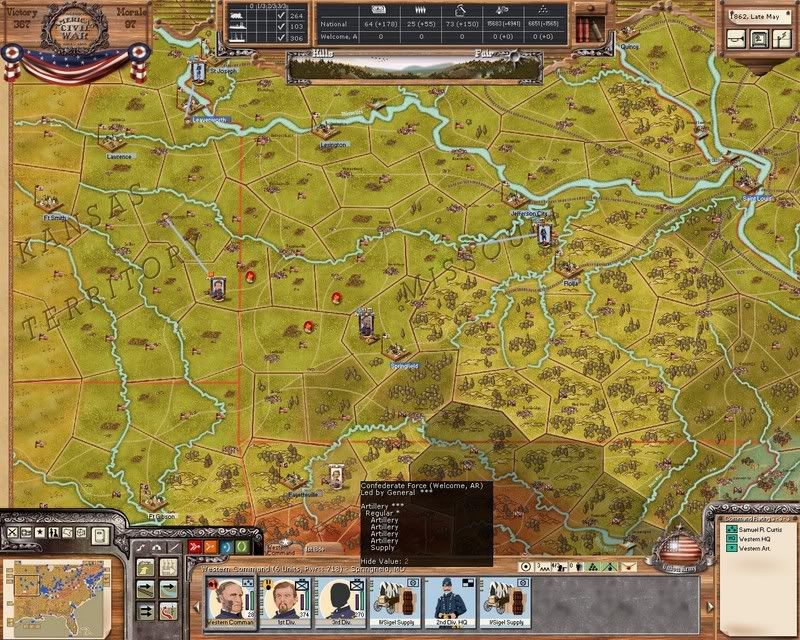
The only Morale shift this turn occured in Missouri, thanks to Samuel Curtis. Stand Watie and 5 cavalry regiments staged a raid on the depot at Springfield, where Curtis had wisely decided to fall back on. Instead of a lone militia rgt, Watie found Curtis entire army:
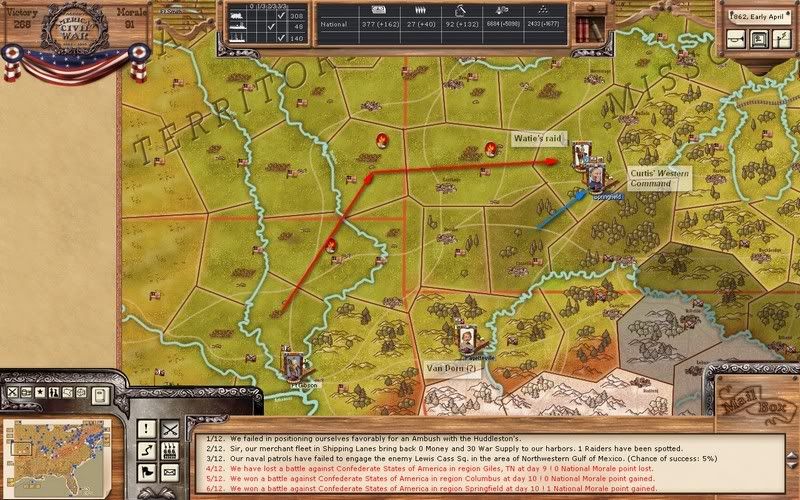
The Waties Indians charge into what turns out to be a trap:
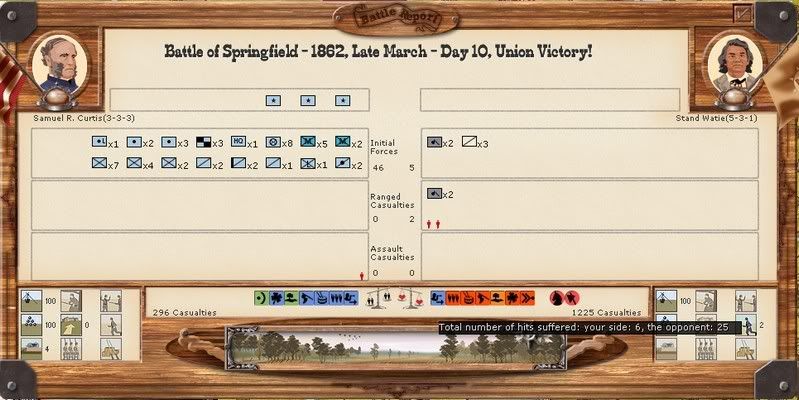
The subsequent battles don't go as well for the Union, as the remaining regular CSA cavalry manages to successfully nip at the flanks of the Union army, nimbly avoiding destruction (I've noticed these sorts of upsets in my other games, typically when cavalry is involved):
The Waties Indians charge into what turns out to be a trap:
The subsequent battles don't go as well for the Union, as the remaining regular CSA cavalry manages to successfully nip at the flanks of the Union army, nimbly avoiding destruction (I've noticed these sorts of upsets in my other games, typically when cavalry is involved):
-
jimwinsor
- General of the Army
- Posts: 631
- Joined: Sat Apr 14, 2007 7:07 am
- Location: San Diego, CA USA
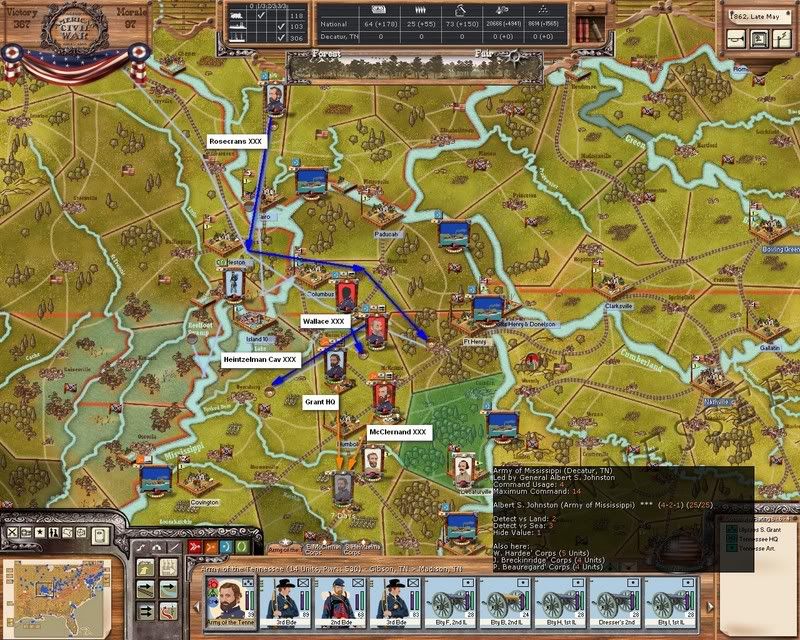
Tennessee
Grant's probing moves with his corps go as planned. Columbus is assaulted and taken (no surprise), while McClernand occupies Humboldt without opposition.
I was worried a major battle might have occured at Humboldt, had Johnston moved agressively, but no...he went just one county north of Corinth, and stayed put. The lines have been drawn:
Grant is generating a pleasing amount of leadership bonuses to his corps commanders, I notice, making them quite competant; McClernand is now a 5-3-3, for instance!
Elsewhere in Tennessee, a couple brigades of CSA troops wipes out my partisans at Pulaski (an ambush setting attempt failed, sadly). Perhaps Hindman was aiming for Nashville, but got stuck at the rail break? In any case, not too worried about them, with the gunboats cutting the rail tressles over the river, don't see them getting much supply. Pulaski is a CSA depot, and it's now empty:
Plus, an event just gave me a fresh brigade of Volunteers at Nashville. So, not too worried about this force. Those gunboats are worth their weight in gold, IMO.
-
jimwinsor
- General of the Army
- Posts: 631
- Joined: Sat Apr 14, 2007 7:07 am
- Location: San Diego, CA USA
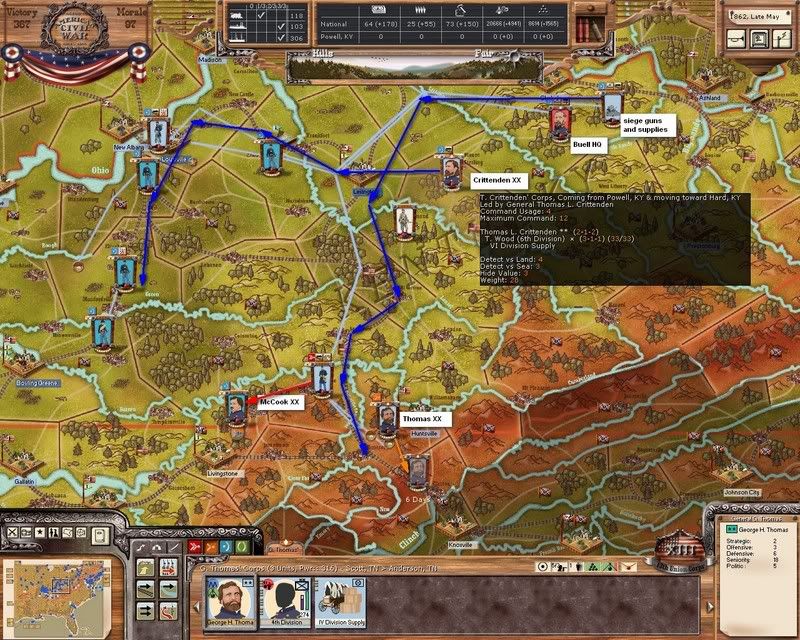
The prelude to the Battle for Lexington. All of Buell's forces rail to where they were supposed to go, and apparantly, NO CSA troops were sent up through the Cumberland Gap to oppose me. A bit of a relief, I must say. HOWEVER, the Kentucky event buggily fired, turning much of pro-Union Kentucky to pro-Confederate. This will be annoying, I fear.
A duplicate Orphan Brigade has formed in Lexington, which will make this a somewhat tough fight; fortunately, Crittenden is activated and already has gotten a head start in his move into the area:
A duplicate Orphan Brigade has formed in Lexington, which will make this a somewhat tough fight; fortunately, Crittenden is activated and already has gotten a head start in his move into the area:
-
jimwinsor
- General of the Army
- Posts: 631
- Joined: Sat Apr 14, 2007 7:07 am
- Location: San Diego, CA USA
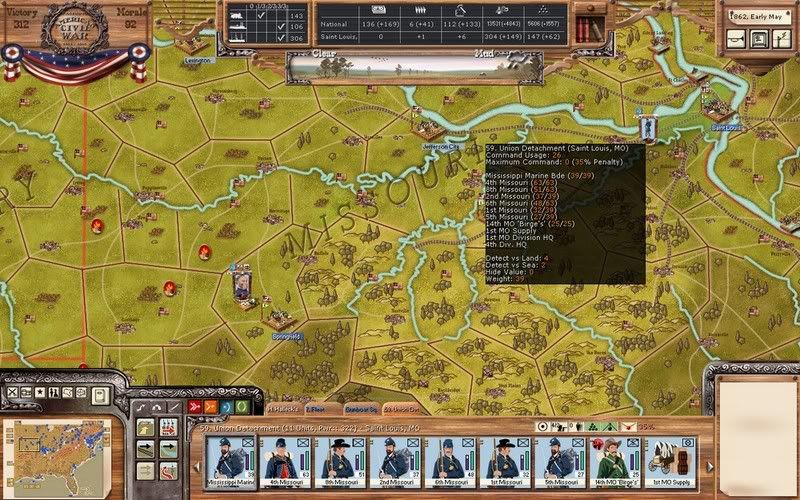
Missouri, Late April '62
Pretty quiet. The battered remnants of the CSA cavalry raid depart westwards from Springfield; neither of my detached division commanders there were able to bring them to battle before the left.
Mud and snow conditions still prevail throughout most of this area.
Halleck is training new MO regulars in St. Louis; 4 are (barely) ready for action. They'll be sent down to Curtis (the Elder):
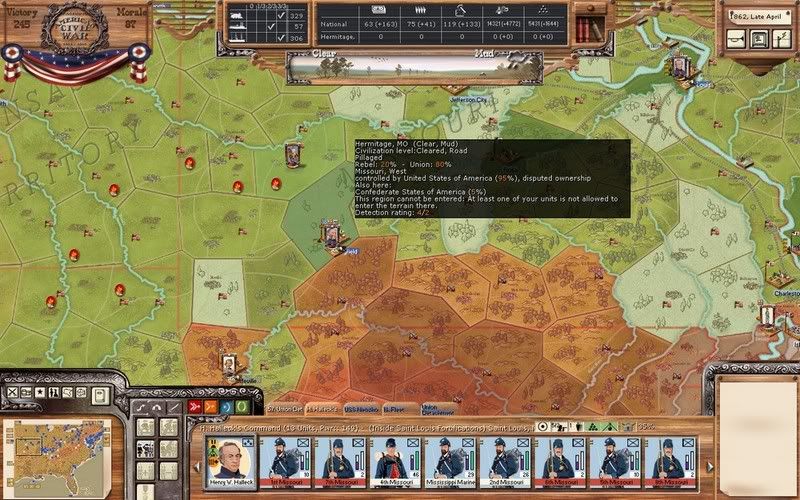
Mud and snow conditions still prevail throughout most of this area.
Halleck is training new MO regulars in St. Louis; 4 are (barely) ready for action. They'll be sent down to Curtis (the Elder):
-
jimwinsor
- General of the Army
- Posts: 631
- Joined: Sat Apr 14, 2007 7:07 am
- Location: San Diego, CA USA
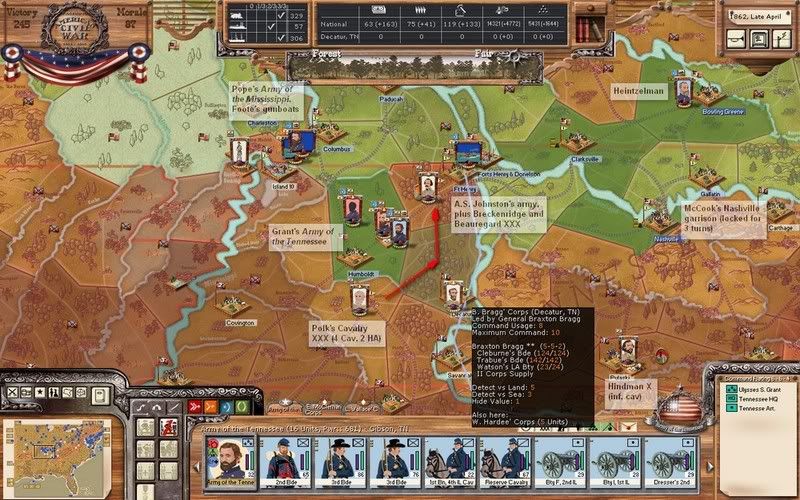
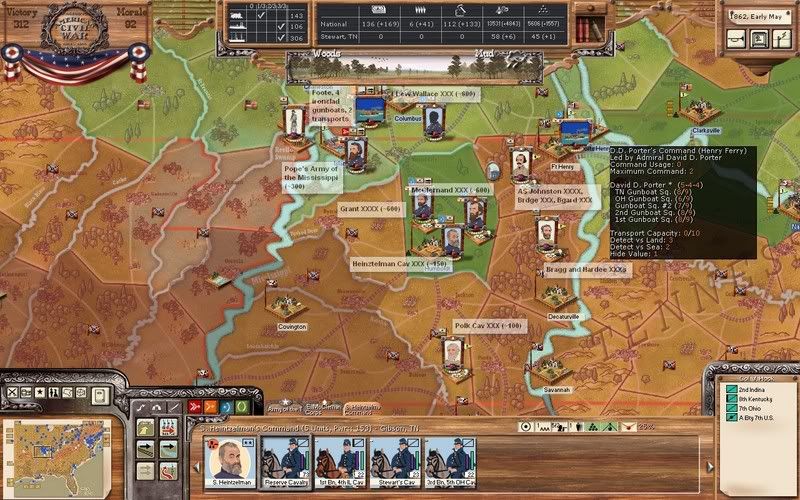
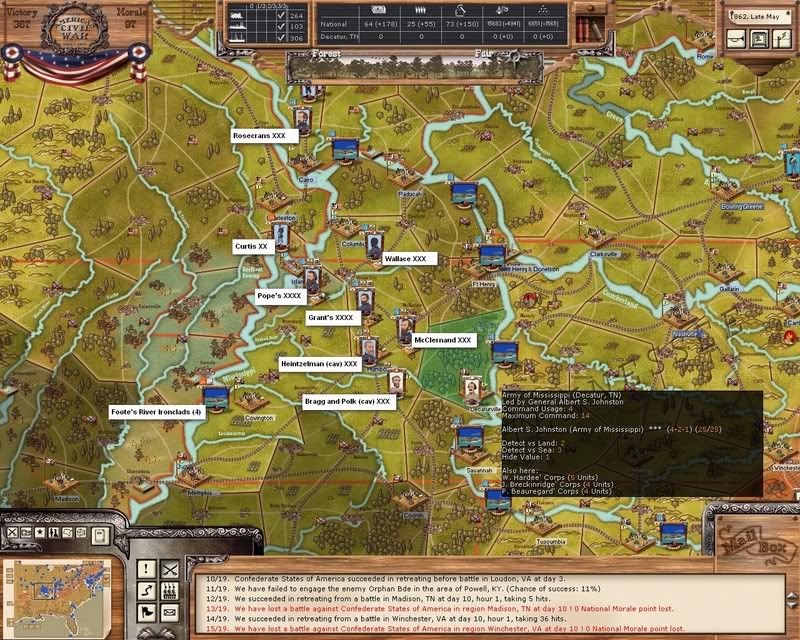
Tennessee: Johnston's March Around Grant
Oh, ok, so thats how we're gonna play it!
Avoiding a direct attack on Grant's new depot + concentrated army at Humboldt, Johnston sidles around to the east, taking Decatur and sieging my *former* base at Ft. Henry. Two corps are now at Henry, while Bragg's and Hardie's corps follow close behind.
Ft. Henry is manned by two empty divisional staffs, which will try to evacuate by steamboat immediately.
His strategy thus far seems to be to try to cut my supply, thus force me to attack to the rear to clear them. This both delays my advance, and puts me in the tactically disadvantageous offense for battles.
A further example of this strategy, he's formed a cavalry corps under Polk, to go a-raiding in force behind my lines, presumably. It's big enough to assault thinly garrisoned towns.
Well, the interesting thing is, the supply line thru Ft. Henry is due to be cut anyways, not by Johnston but also by the whole state of Kentucky. I'm about to lose control of the whole rail line between Loiusville and Bowling Green; my loyalty in that area is slipping to about 27% loyalty, and similar %s for control. Once control dips under 25% the rail is blocked to me. At game start, loyalty was 60-40 Union! This Kentucky bug was a very very bad thing.
So, given that Johnston is now astride a supply line that is not currently of much use to me anyways, due to a bug, I'm not going to get all hot and bothered over this. The new depot at Humboldt is complete, and should start attracting supplies from Cairo, down river through Columbus (and Island 10 soon, hopefully).
The Mississippi will have to be Grant's supply line, not Kentucky.
Given this, if he stays true to form...I predict the next move for the CSA West c-in-c will be a lunge at Columbus, to complete the encirclement.
In anticipation of this, the Wallace/Sherman corps will march back to Columbus. Should there be a fight there, Grant, McClernand AND Pope should all be in range to march to the sound of guns.
As far as Polk's cavalry goes, I'll organize a like corps of my own under Heintzelman, as soon as he arrives. I have enough cav with Grant do this, I think.
Once the little supply pallet in the middle of Humboldt begins to fill up nicely, Grant can then think about moving against Johnston, instead of vice-versa. I do need to keep the pressure on up there, so as to prevent reinforcements being sent down to New Orleans.
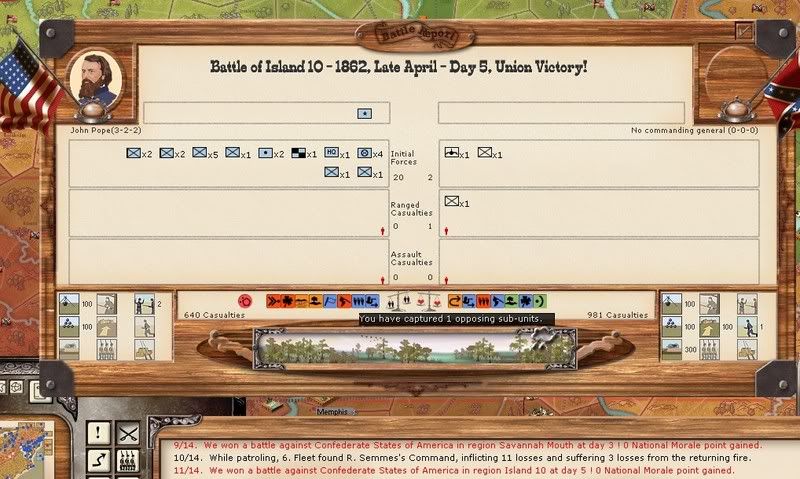
As for Pope, he is right on schedule, and he is activated for Assault. Foote bombarded Island 10 for 38 hits, and should dish out similar punishment start of next turn; if all goes well both Island 10 and New Orleans should fall simultaneously:
Avoiding a direct attack on Grant's new depot + concentrated army at Humboldt, Johnston sidles around to the east, taking Decatur and sieging my *former* base at Ft. Henry. Two corps are now at Henry, while Bragg's and Hardie's corps follow close behind.
Ft. Henry is manned by two empty divisional staffs, which will try to evacuate by steamboat immediately.
His strategy thus far seems to be to try to cut my supply, thus force me to attack to the rear to clear them. This both delays my advance, and puts me in the tactically disadvantageous offense for battles.
A further example of this strategy, he's formed a cavalry corps under Polk, to go a-raiding in force behind my lines, presumably. It's big enough to assault thinly garrisoned towns.
Well, the interesting thing is, the supply line thru Ft. Henry is due to be cut anyways, not by Johnston but also by the whole state of Kentucky. I'm about to lose control of the whole rail line between Loiusville and Bowling Green; my loyalty in that area is slipping to about 27% loyalty, and similar %s for control. Once control dips under 25% the rail is blocked to me. At game start, loyalty was 60-40 Union! This Kentucky bug was a very very bad thing.
So, given that Johnston is now astride a supply line that is not currently of much use to me anyways, due to a bug, I'm not going to get all hot and bothered over this. The new depot at Humboldt is complete, and should start attracting supplies from Cairo, down river through Columbus (and Island 10 soon, hopefully).
The Mississippi will have to be Grant's supply line, not Kentucky.
Given this, if he stays true to form...I predict the next move for the CSA West c-in-c will be a lunge at Columbus, to complete the encirclement.
In anticipation of this, the Wallace/Sherman corps will march back to Columbus. Should there be a fight there, Grant, McClernand AND Pope should all be in range to march to the sound of guns.
As far as Polk's cavalry goes, I'll organize a like corps of my own under Heintzelman, as soon as he arrives. I have enough cav with Grant do this, I think.
Once the little supply pallet in the middle of Humboldt begins to fill up nicely, Grant can then think about moving against Johnston, instead of vice-versa. I do need to keep the pressure on up there, so as to prevent reinforcements being sent down to New Orleans.
As for Pope, he is right on schedule, and he is activated for Assault. Foote bombarded Island 10 for 38 hits, and should dish out similar punishment start of next turn; if all goes well both Island 10 and New Orleans should fall simultaneously:
-
jimwinsor
- General of the Army
- Posts: 631
- Joined: Sat Apr 14, 2007 7:07 am
- Location: San Diego, CA USA
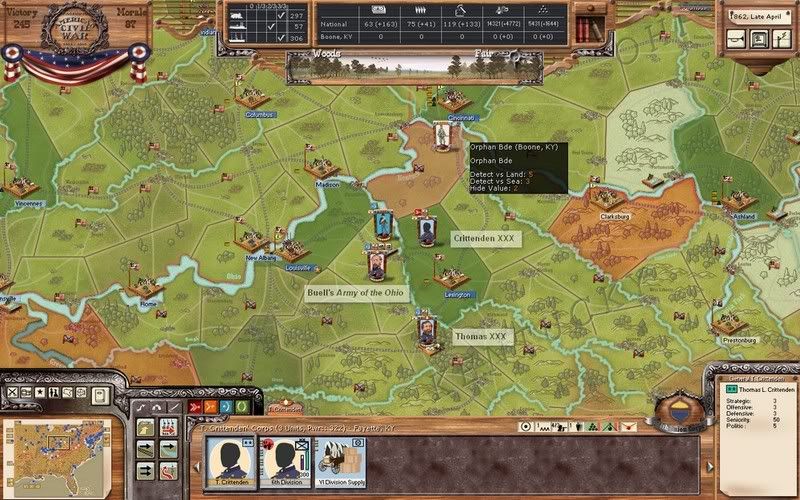
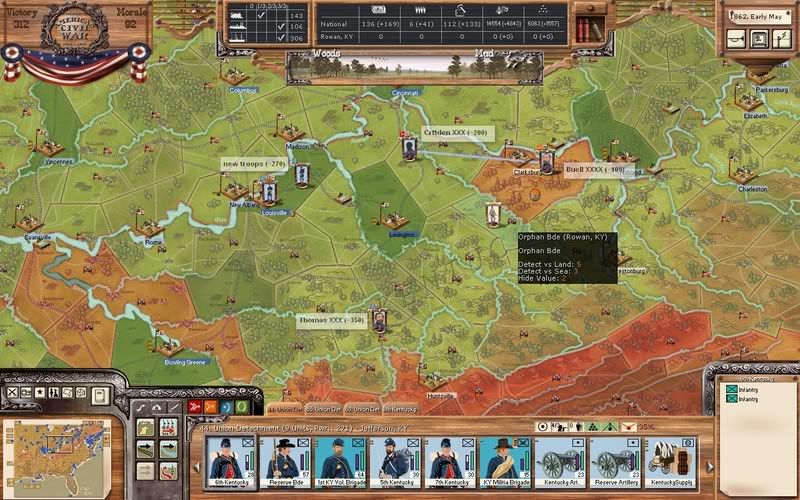
Lexington Captured, Kentucky Seethes With Rebellion
Crittenden assaults Lexington, but not before the cloned Orphan Brigade skedaddles to the north.
Now, before anyone goes "OMG! Cincinatti!" it should be noted that the north bank of the Ohio is all mud now, not to mention that major river in the way.
All of Buell's army is activated. The plan now is for Crittenden to detach a couple brigades, then plot to Intercept and hunt down the Orphans. Buell will take the siege guns and army HQ, and along with the detached brigades move on Clarksburg, putting it under siege. Thomas will advance south towards the Cumberland Gap.
I'm hoping once every city in Ky is occupied (ie, Clarksburg, then Prestonburg), it'll begin to shift it's loyalty back to the Union (thats how it works, right?):
-
jimwinsor
- General of the Army
- Posts: 631
- Joined: Sat Apr 14, 2007 7:07 am
- Location: San Diego, CA USA
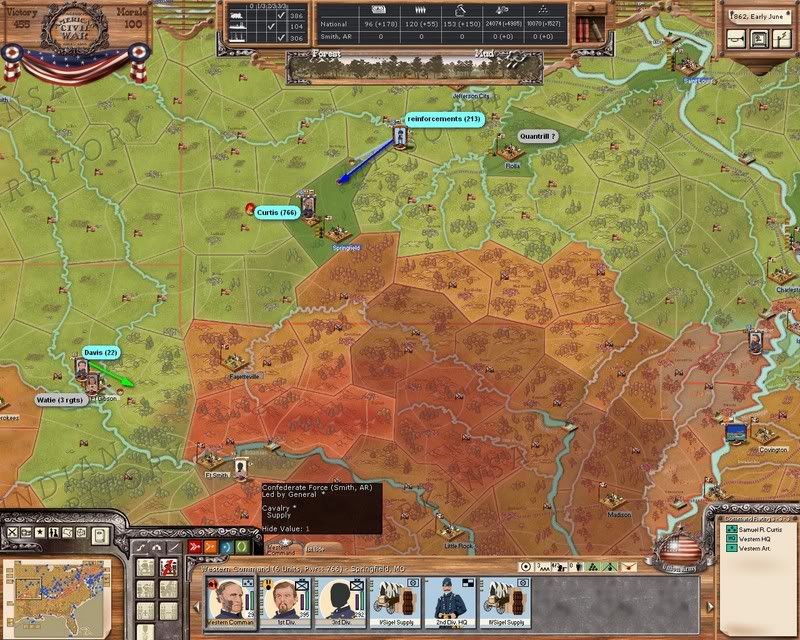
Missouri, Early May '62
New turn results! First, MO. Not much happening, except a bunch of new troops in St. Louis, ready to reinforce Curtis at Springfield. By then roads should be cleared of mud, ready for a big push on Fayetteville:
-
jimwinsor
- General of the Army
- Posts: 631
- Joined: Sat Apr 14, 2007 7:07 am
- Location: San Diego, CA USA
Victory at Island 10
Pope's assault goes smoothly:
...meanwhile, Grant and AS Johnston continue to stare at each other in west Tennessee. Wallace's corps moves north the secure my supplies through Columbus; the CSA corps just sit there.
I'm getting a supplies now coming into Humboldt, all troops are at full cohesiveness...I'm not sure how cohesive his forces are, positioned so tenuously from his depot at Corinth. I get the feeling I am much better off...problem is, I'm getting frustrating little intel on the power numbers of his infantry corps. My approximate power numbers are in parenthesis:
I'd hate to attack him in those forests at equal strength. He's partially entrenched by now, and the forest would not help my cannons (of which Grant has a lot. I'd much rather battle him in Open terrain.
I think I have a plan, tho ...
...
...meanwhile, Grant and AS Johnston continue to stare at each other in west Tennessee. Wallace's corps moves north the secure my supplies through Columbus; the CSA corps just sit there.
I'm getting a supplies now coming into Humboldt, all troops are at full cohesiveness...I'm not sure how cohesive his forces are, positioned so tenuously from his depot at Corinth. I get the feeling I am much better off...problem is, I'm getting frustrating little intel on the power numbers of his infantry corps. My approximate power numbers are in parenthesis:
I'd hate to attack him in those forests at equal strength. He's partially entrenched by now, and the forest would not help my cannons (of which Grant has a lot. I'd much rather battle him in Open terrain.
I think I have a plan, tho
...-
jimwinsor
- General of the Army
- Posts: 631
- Joined: Sat Apr 14, 2007 7:07 am
- Location: San Diego, CA USA
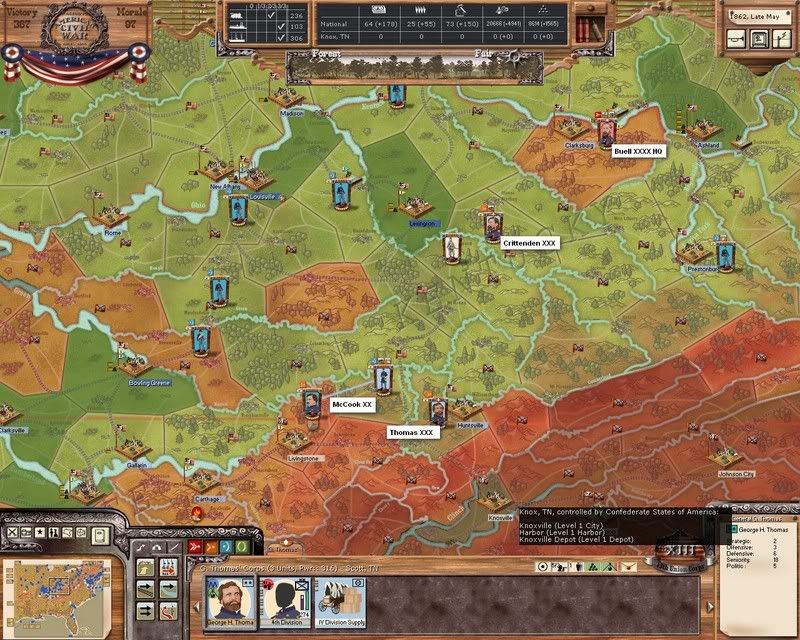
Kentucky: Hunting Orphans
I missed the Orphan Brigade; Crittenden did not catch it, and it moved to Clarksburg...but Buell beat them there via rail move, with the siege guns plus a cav and an inf brigade, about a 100 power's worth...and the Orphans successfully retreated west. Sigh.
Oh well, the good news is Clarksburg is under siege, and should fall this turn...a new Ohio militia showed up in Ashland, and will proceed by riverboat and occupy Prestonburg, the last CSA town in Ky...and best news of all, Thomas moved south, and discovered Huntsville to be unoccupied! The northern gateway to the Cumberland Gap is mine for the taking...
Tentative plan now is for me to send Thomas all those new Ky recuits now activated in Louisville, and then move on Knoxville...with approximately 2 divisions.
Note that I lost control of the rail line to Bowling Green as predicted (grumble...). 6 new Ohio militia plus one activated Ky one will try to remedy this, the hard way...by just sitting on the rails.
Not pictured: McCook took a brigade out of Nashville and occupied the Tn town just east of it, unopposed:
-
jimwinsor
- General of the Army
- Posts: 631
- Joined: Sat Apr 14, 2007 7:07 am
- Location: San Diego, CA USA
Plans for Next Turn
In Missouri, Curtis (the Elder)'s reinforcements will take awhile to reach him thru the mud to Springfield. So, in the meantime, Jefferson C. Davis breaks up his division, merges with a large cavalry brigade, and goes off in pursuit of those CSA cavalry raiders. Following the trail of pillaging, it looks like they are currently in Irving, probably headed to Lawrence, Kansas. Which is ungarrisoned, along with the nearby Indian village. Annoying! I should have done this last turn:
-------------------------------------------------------------------------
Meanwhile, a more complex situation in Tennessee. Curtis (the Younger) splits off his division from Pope's army (which now consists of only a supply wagon) and plots a move into New Madrid. Surpisingly, we get a roundabout path that gets him there, in the midst of the Reelfoot Swamp, in only 14 days (!). Must be a path or some such from the west into the swamps; the movement system can be quirky like this sometimes, I have noticed.
Grant orders Heintelman's new Cavalry Corps south into Jackson, where it is expect to run into Polk's weaker cavalry corps.
OK. Both my forces in Humboldt and his in Decaturville are eligible to react; I'm actually hoping they ALL will join in the kerfuffle. Grant and McClernand command 1500 power worth of troops. Intel shows Bragg's corps at only 2 brigades; strong ones, but still only 300 power total. Not sure about Hardee, who is stacked underneath. BUT with the battle in clear terrain, me with lots of guns (Grant has 4 batteries of 20lb Parrots alone), no one entrenched...should be a good battle! For me. Hopefully!
Thats the plan. If it goes as outlined above, I should not only crush half his army, but be in position to either cut his supply completely by moving into Purdy, or simply taking Corinth itself.
Rosecrans just showed up in Cairo, he has declared himself a corps in Pope's army. 5 new Illinois brigades are on the way to join him there.
Foote is going downriver a bit with his 4 "turtles," to check out what going on in Memphis; might as well lob a few shells into town while I'm there.
All 3 river transports in the area are docking in Columbus; they all have supplies onboard that I want the depot in Humboldt to draw from. Might as well help the supply system do it's job they way I want it done.
Over there in the eastern edge, McCook leads a brigade of Tennessee loyalists against another border town; this one is occupied (according to intel, the 121st Tn... a reinforcement gathering strength?) so, we will lay siege to the place. He'll be joined there next turn by a new division of Ky troops, which I'm going to put him in command of.
-----------------------------------------------------------------------
Over in Kentucky, Buell will assault Clarksburg, while new Ohio militia from Ashland will steam into unoccupied Prestonburg. Which BTW is the last CSA town in Ky. My "invasion" is complete!
I think I can now ignore the Orphans, as they don't have any place to run, are probably weak, and will eventually starve. Crittenden will move towards the Gap on foot, maybe doing battle, maybe not. If I don't kill them this turn I'm just going to ignore them.
Thomas is plotted to take Huntsville unopposed. Had it been defended, it would have been a tough nut to crack (a mountain, behind a river, flanked by two impassible mountains), so this is quite a coup for me, I think. I although I should not count my chickens yet; with mud it'll take Thomas the full 15 day turn to get there, and in the meantime defenders could be railed in. We'll see.
Other Ohio and Ky militiamen deploy to secure the rail lines in the most virulently disloyal areas of Kentucky. A new division of troops heads towards the Gap, earmarked for McCook to assume command of.
All 3 river transports in the area are docking in Columbus; they all have supplies onboard that I want the depot in Humboldt to draw from. Might as well help the supply system do it's job they way I want it done.
This won't works, supply wagons and transports can give supply to troops (in same region or adjacent) but never give back to structures their stock. This is done on purpose: once the unit is loaded with food, it can only be syphoned by units.
Hofstadter's Law: "It always takes longer than you expect, even when you take into account Hofstadter's law."
-
jimwinsor
- General of the Army
- Posts: 631
- Joined: Sat Apr 14, 2007 7:07 am
- Location: San Diego, CA USA
Free Land!
A surprisingly uneventful turn here in the West. I expected some fireworks in Tennessee, but those did not develop. This random event was probably the most important thing that happened this turn; Free Land and +5 Morale ties us now with the CSA, 97-97:
-
jimwinsor
- General of the Army
- Posts: 631
- Joined: Sat Apr 14, 2007 7:07 am
- Location: San Diego, CA USA
Missouri Mired in Mud
Geez does it ever stop raining in Missouri? Springfield is still surrounded by mud; my reinforcement from St. Louis are still a months march away at this rate.
Even Van Dorn is getting sick of the area, and is marching east.
JC Davis' cavalry couldn't find those raiders; perhaps they lost cohesiveness and disbanded. Well good; maybe I'll send him south now, and raid his Indian villages.
Even Van Dorn is getting sick of the area, and is marching east.
JC Davis' cavalry couldn't find those raiders; perhaps they lost cohesiveness and disbanded. Well good; maybe I'll send him south now, and raid his Indian villages.
-
jimwinsor
- General of the Army
- Posts: 631
- Joined: Sat Apr 14, 2007 7:07 am
- Location: San Diego, CA USA
Cavalry Clash in Tennessee
Remember my big plan to cause a cavalry battle in Madison Cty, Tenn, with the intent to draw everyone's nearby corps in for a big decisive battle there? Well, it did not quite work out that way. Turns out, his forces showed up, mine did not:
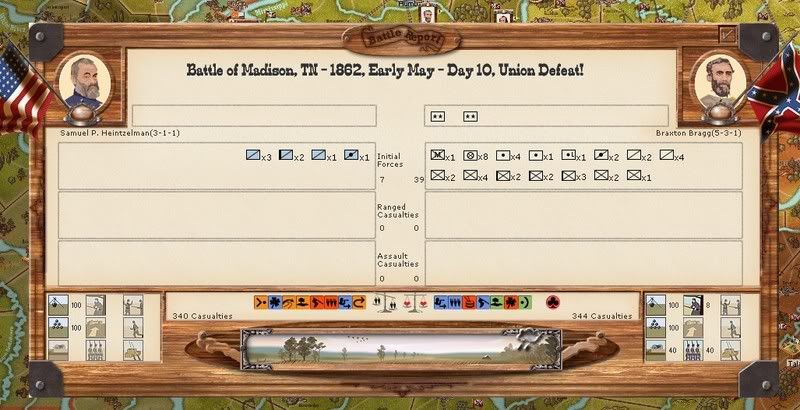
Seems what happened is, Bragg forced marched his small corps into Madison first. Heintzelman was this outnumbered, and opted to retreat. And did so on the first round rather easily, being all cavalry. So, there was no sound-of-guns for me, while Hardee did show up for him. The net result was basically a one round cavalry skirmish, with light losses on both sides; him "winning" the battle by just 4 men.
This does give a pretty clear picture of the makeup of both his Bragg and Hardee "corps"...looks like 16 Inf elements, and 6 batteries of guns, totalled. Hmmmm. Barely a division's worth between the two of 'em.
Here are the dispositions. Bragg's force march into Madison was part of a general pull back to the south for him, with his two other corps abandoning Ft. Henry, and joining Hardee in Decaturville. I guess he finally realized he was not doing much good loitering around up there:
Grant's commands 600 power worth of troops and guns directly. McClernand and Wallace's corps each have two maxxed out Union divisions, fully supplied and rested, plus additional cannon, giving each over 900 power. And I'm looking at a largely unentrenched army that has just forced marched itself out of a precarious supply situation. Hmmm. To use poker terminology, I think it's time to go "all in."
Pope HQ is leading a supply wagon right now, however the division led by the clone Curtis swooped around and crushed the CSA garrison at New Madrid (getting a senority boost in the process). Pope is also technically in command of the new corps declared in Cairo under Rosecrans (a division of fresh recruits).
Gunboat reconnaisance by Foote indicates that Memphis is being defended by what appears to me it's fixed garrison and guns, as well as the European Brigade. That'll be next on Pope's "To Do" list, as soon as his forces are reloaded onto transports.
-
jimwinsor
- General of the Army
- Posts: 631
- Joined: Sat Apr 14, 2007 7:07 am
- Location: San Diego, CA USA
Kentucky
No action in Kentucky, all my moves there proceeded without opposition.
Buell took Clarksburg by bombarding it to death with siege artillery, as there was a breach (causing 25 hits) but no assault.
Meanwhile, freshly raised Ohio militia riverboated into the final town of Prestonburg unopposed. Kentucky is now all-Union...I do wish someone would tell the Kentuckians that though. Union loyalty on key stretches of rail line is down to 11%. Time for some Martial Law. Which I should have asked to have done a couple turns ago, in fact. Grumble...
Crittenden's corps (actually a division) is totally tired out from trying to both march overland to Thomas' postion to the south thru the mud, and bring that wayward CSA brigade to battle. It's going to give up on that, and along with Buell, go on some "hearts and minds" operations to get our control in key Kentucky areas back to green.
Thomas' corps (of one division) took Huntville unopposed, closing the Cumberland Gap. Those mountain roads are now dry, thus he is free to move south to Knoxville next turn..which I may well do. Huntville will have a depot, as soon as I can get wagons there.
McCook has laid siege to a Tennessee town with a regular CSA brigade garrisoning it...probably a reinforcement that came in in a bad spot. A whole fresh unled division will join him there, then we might as well assault. This new McCook division will then be assigned to cover Nashville, and flush out any CSA forces hiding in central Tennessee. Intel reports that a 3-unit force led by a certain "N. Forrest" is present in Pulaski (just south of Nashville):
-
jimwinsor
- General of the Army
- Posts: 631
- Joined: Sat Apr 14, 2007 7:07 am
- Location: San Diego, CA USA
OK this turn should see some fireworks out west.
In Missouri, not much due to mud going on, but JC Davis is in a dry area, and will swoop in on Fort Gibson:
Grant (with McClernand's corps) makes a synchronized attack south...no more games. I opt to go over the minor river into Madison Cty, rather than into the forests around Decaturville, as the rules seem to indicate a minor river is a less defensive terrain feature than a forest. And besides, Grant has a lot of Parrott cannon with him, with a range of 7, so I'll opt for the clear terrain.
Wallace's corps rails into Humbolt in one day, so he'll be able to support the battle from there, hopefully. Same with Heintzelman's cavalry, which is marching west to Dyersburg to begin to convert the rail line to Memphis to Union control.
Rosecrans corps (with a new recruit division) will march over and reoccupy Ft. Henry. Next turn I'll probably disband/recreate the corps so as to transfer him from Pope's to Grant's authority.
In Kentucky, the roads are relatively dry. I could move to Knoxville with Thomas, and be there in 13 days. Problem is, I have no idea what is there. If he's got decent troops there, Thomas will get a bloody nose moving to Knoxville like that, over a river, into a forest/mountain province. So, Thomas will cautiously advance adjacent to Knoxville for now.
Other Ky forces move to secure territory.
-
jimwinsor
- General of the Army
- Posts: 631
- Joined: Sat Apr 14, 2007 7:07 am
- Location: San Diego, CA USA
Where's Van Dorn?
Well lets get the Missouri stuff out of the way, then onto the fun stuff. 
Davis failed to find Fort Gibson empty; Watie's stealthy indians were there. Good thing for me they did not ambush. In any case, too many indians, not enough cowboys, so Davis skillfully retreated eastwards without battle.
Hmm, Fayetteville looks abandoned, the depot destroyed. And Van Dorn's army no where to be seen (although I did note it's movement eastwards last turn). Hmmmm.
Well, needless to say, Curtis will swoop down and snatch this victory city next turn (the weather is finally fair). But this does have me wondering where Van Dorn has gone off to. He could have reached the Arkansas River and begun steamboating to somewhere outside the transmississippi; if this is the case I can envision 3 reasonably possible ultimate destinations:
1) Memphis
2) Johnston's army and Corinth
3) New Orleans (this would be very sneaky, IMO...I need to warn my co-commanders)
Also, the events noted that I failed to engage Quantrill in Rolla (odds were something like 0%), so I guess I best brace myself for some torn up rails in that area. Best send a cavalry regiment up there to search for him.
If Van Dorn is truly gone from the front, I now have WAY to many troops to get the job done in this sector, it would appear. I must consider redeploying some...
-
jimwinsor
- General of the Army
- Posts: 631
- Joined: Sat Apr 14, 2007 7:07 am
- Location: San Diego, CA USA
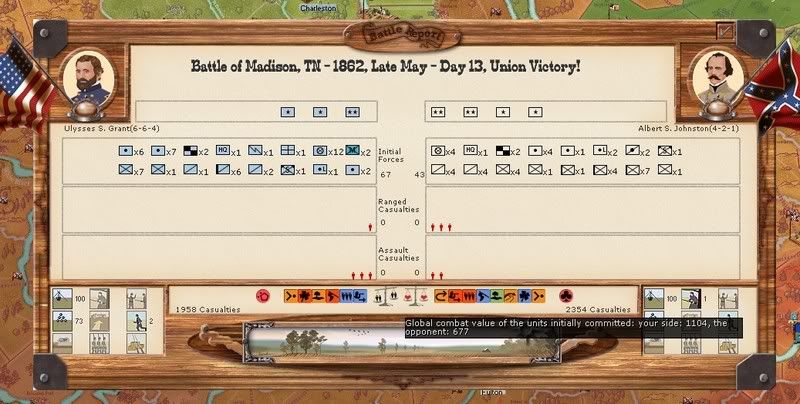
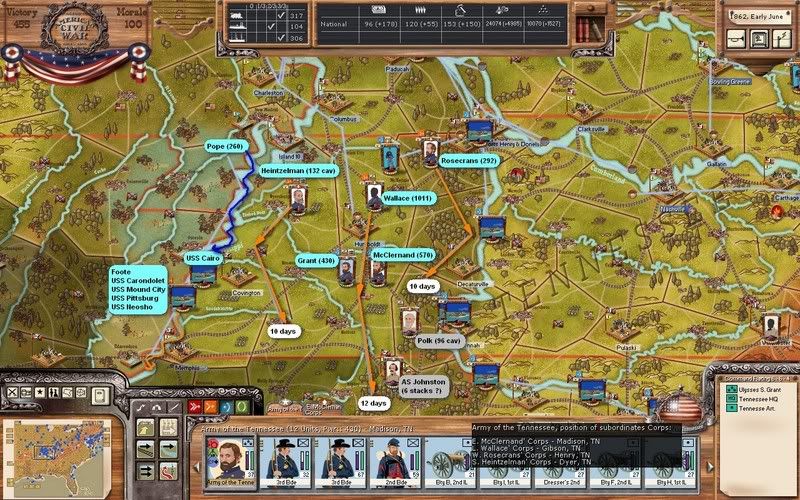
Madison Square Gardens
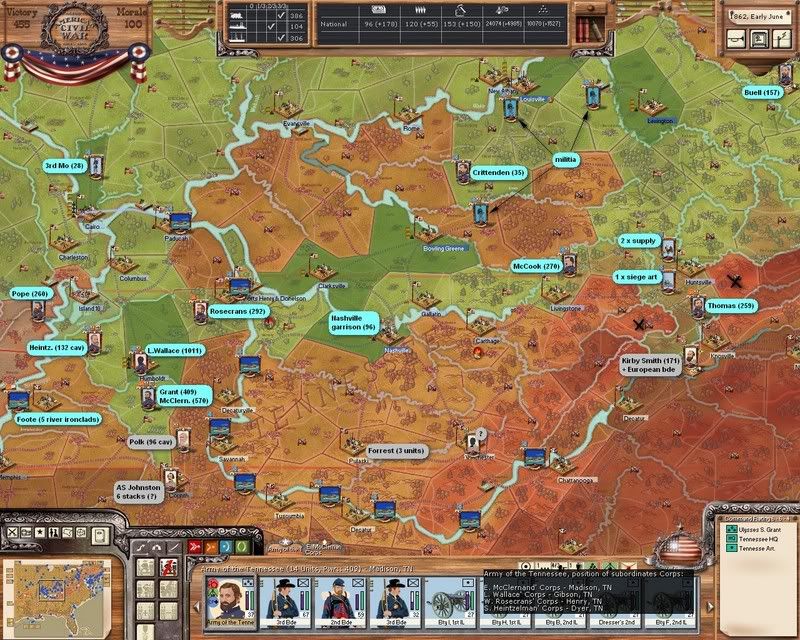
With the winding down of operations in Kentucky, I'm going to show this as a combined Tn-Ky megamap. Power numbers for the forces in ().
Even though not fully rested yet, I'm going to load Pope's army onto transports in New Madrid, and sail them down river, in preparation for an immediate landing in Memphis. As I said above, that may be where Van Dorn is heading, so I'd like to get there first (and hopefully, with the most too).
One thing that is kind of odd is, Foote's ironclads have been on bombardment orders for the past two turns, and though adjacent to Memphis (Hatchies Confluent), they have not bombarded. A bug perhaps? The CSS Arkansas is docked there..would that prevent a bombardment maybe?
On the other end of the line, Thomas finds Kirby Smith and a whole division waiting for me in Knoxville, with sandbags and cannon on it's unit base. Good thing I opted not to rush in. Not sure what I'm going to do with Thomas, as he is certainly not strong enough to proceed now, but holding that end of the Gap is a good thing. To emphasize the terrain situation in the area, I marked impassible mountain provinces with an "X".
And Grant, of course, did quite well in Madison County. More on that later, but for now, here's the map:
--------------------------------------------------------------------------
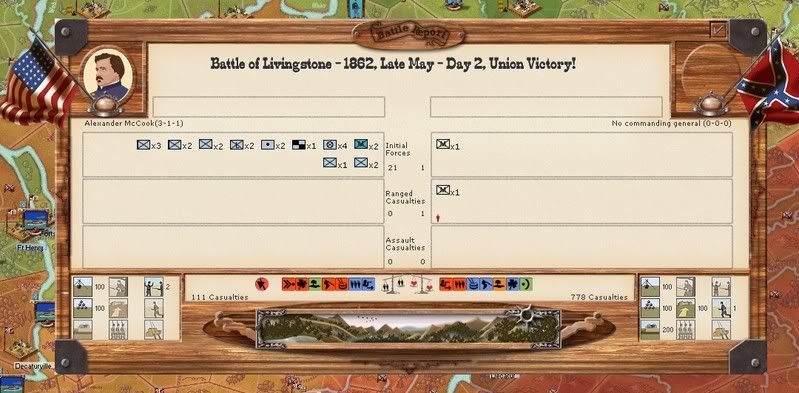
On to the battles. The first was McCook's assault on Livingstone, which was only garrisoned by a militia (not a regular as I had feared/hoped):
--------------------------------------------------------------------------
Now onto Madison Cty, round 1...we caught Hindman and Bushrod Johnson's far smaller command alone while crossing the river (I'm discovering now this stroke of luck may have been due to a CSA movement error with Bragg's corps...hmmm):
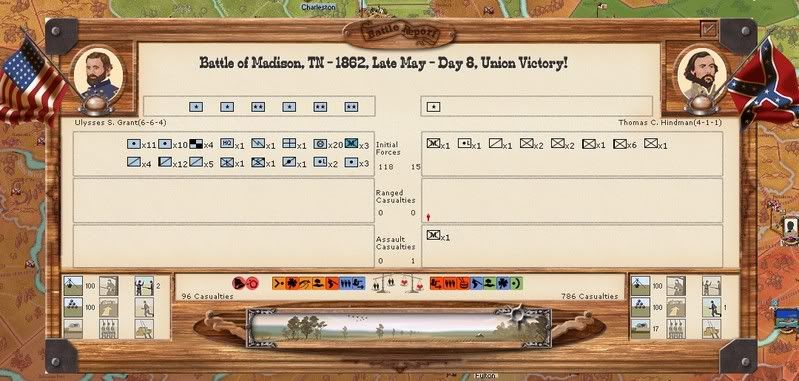
--------------------------------------------------------------------------
Round 2 was the knockout punch. Note the CSA with the river crossing penalty, rather than me. Also, I opened at range 7 with my 20lbers (10 batteries of 'em, muhuhahah), him at range 6, and as you can see, the artillery duel was the decisive phase of this battle:
--------------------------------------------------------------------------
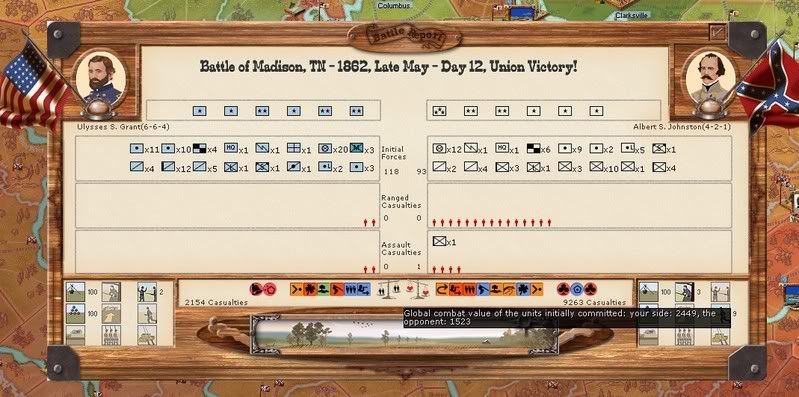
Round 3 with just Grant and McClernand in pursuit was the final jab. Not as impressive as the first two rounds, and I suspect the reason for that was that McClernand had used up all his ammo in rounds 1 and 2 (I neglected to include a supply wagon with his corps, an oversight I'll be sure to rectify this coming turn):
--------------------------------------------------------------------------
Tentative plans now are to hit that army in Corinth again, hard. Before he gets a chance to entrench there, and/or gets reinforced (see speculations re: Van Dorn, above). Wallace's corps is relatively cohesive, unbloodied and in striking distance, and will most likely lead the way this time.
One minor gripe about the battles...Wallace and Hurlbut (only) got noticed. I wish Sherman could have gotten a senority boost. leure: I need to promote him ASAP, as the C-in-C is hinting at leadership transfers, west to east.
Also, one more oddity/possible bug to note (beside the naval bombardment at Memphis one): Kentucky is still displaying some strange control percentages. For example, at Clarksburg, Union control is at 41%, CSA control at 14%...so who controls the other 45%? You see lots of these percentages not adding up, mostly in Kentucky, but in a few spots in east Tennessee as well, I notice.
Even though not fully rested yet, I'm going to load Pope's army onto transports in New Madrid, and sail them down river, in preparation for an immediate landing in Memphis. As I said above, that may be where Van Dorn is heading, so I'd like to get there first (and hopefully, with the most too).
One thing that is kind of odd is, Foote's ironclads have been on bombardment orders for the past two turns, and though adjacent to Memphis (Hatchies Confluent), they have not bombarded. A bug perhaps? The CSS Arkansas is docked there..would that prevent a bombardment maybe?
On the other end of the line, Thomas finds Kirby Smith and a whole division waiting for me in Knoxville, with sandbags and cannon on it's unit base. Good thing I opted not to rush in. Not sure what I'm going to do with Thomas, as he is certainly not strong enough to proceed now, but holding that end of the Gap is a good thing. To emphasize the terrain situation in the area, I marked impassible mountain provinces with an "X".
And Grant, of course, did quite well in Madison County. More on that later, but for now, here's the map:
--------------------------------------------------------------------------
On to the battles. The first was McCook's assault on Livingstone, which was only garrisoned by a militia (not a regular as I had feared/hoped):
--------------------------------------------------------------------------
Now onto Madison Cty, round 1...we caught Hindman and Bushrod Johnson's far smaller command alone while crossing the river (I'm discovering now this stroke of luck may have been due to a CSA movement error with Bragg's corps...hmmm):
--------------------------------------------------------------------------
Round 2 was the knockout punch. Note the CSA with the river crossing penalty, rather than me. Also, I opened at range 7 with my 20lbers (10 batteries of 'em, muhuhahah), him at range 6, and as you can see, the artillery duel was the decisive phase of this battle:
--------------------------------------------------------------------------
Round 3 with just Grant and McClernand in pursuit was the final jab. Not as impressive as the first two rounds, and I suspect the reason for that was that McClernand had used up all his ammo in rounds 1 and 2 (I neglected to include a supply wagon with his corps, an oversight I'll be sure to rectify this coming turn):
--------------------------------------------------------------------------
Tentative plans now are to hit that army in Corinth again, hard. Before he gets a chance to entrench there, and/or gets reinforced (see speculations re: Van Dorn, above). Wallace's corps is relatively cohesive, unbloodied and in striking distance, and will most likely lead the way this time.
One minor gripe about the battles...Wallace and Hurlbut (only) got noticed. I wish Sherman could have gotten a senority boost.
leure: I need to promote him ASAP, as the C-in-C is hinting at leadership transfers, west to east.
Also, one more oddity/possible bug to note (beside the naval bombardment at Memphis one): Kentucky is still displaying some strange control percentages. For example, at Clarksburg, Union control is at 41%, CSA control at 14%...so who controls the other 45%? You see lots of these percentages not adding up, mostly in Kentucky, but in a few spots in east Tennessee as well, I notice.
Pocus: percentages should be normalized with the new turn, normally 
[color="RoyalBlue"]Edit by Korrigan:This turn has been run with the last patch. Do you mean the engine needs two turns to get everything right?[/color]
Pocus: about the bombardment bug, I don't quite know what is at hand, I would need the game for that.
[color="royalblue"]I suspect he does not have any landed troops. This would explain why the fleed does not bombard. Perhaps we should extend the "bombardment" toolitp.[/color]
Hofstadter's Law: "It always takes longer than you expect, even when you take into account Hofstadter's law."
-
jimwinsor
- General of the Army
- Posts: 631
- Joined: Sat Apr 14, 2007 7:07 am
- Location: San Diego, CA USA
Plans for Next Turn
I need landed troops there to bombard? OK, well, I'll rectify that situation soon enough...
Very productive turn coming up in the west, we are attacking two victory cities (Fayetteville and Corinth), and parking an river invasion force next to a victory/objective city (Memphis). Here's the close up of Grant's attack on Corinth:
Wallace's full strength corps is 12 days march away from Corinth, and it should trigger the battle. And by the time it gets there, Heintzelman and Rosecrans should have their corps adjacent to Corinth for SOG support by day 10, which is perfect. With Grant and McClernand resting a few days in Jackson, ready to support as well. We should be able to strike 'em again with the full weight of the Army of Tennessee.
Pope small one-division army boards transports, and sails down to join the USS Cairo on patrol in the Hatchies Confluent next to Memphis. They'll be ready to invade Memephis next turn. Foote and 4 other river ironclads will try to run down past Memphis, to cut off any reinforcements that may try to steam in from that direction.
Off in Missouri, Curtis is plotted to swoop down into apparantly abandoned Fayetteville, another VP city.
Buell's men in Kentucky move about to resecure rail lines.
Pocus wrote:Pocus: percentages should be normalized with the new turn, normally
Edit by Korrigan:This turn has been run with the last patch. Do you mean the engine needs two turns to get everything right?
Pocus: about the bombardment bug, I don't quite know what is at hand, I would need the game for that.
I suspect he does not have any landed troops. This would explain why the fleed does not bombard. Perhaps we should extend the "bombardment" toolitp.
for (1), this is not right, send me the saved game.
for (2), this is not right too
, you don't need troops to bombard in ACW, only in BOA.Hofstadter's Law: "It always takes longer than you expect, even when you take into account Hofstadter's law."
Return to “Grand Campaign I (archive)”
Who is online
Users browsing this forum: No registered users and 10 guests